01. Getting started (get PyZDDE, basic concept, an example)
[Please note The amount of text in this page is not proportional to the amount of work required for getting started. The instructions here are as detailed as possible; the actual time of getting started is just a small fraction of the amount of text you see here.]
If you just want to use PyZDDE, you may quickly download the installable package from PyPI. This is perhaps the easiest way of getting started. The PyZDDE package will be installed in prefix\Lib\site-packages directory (e.g. in C:\Python27\Lib\site-packages). The installation process is described here
[Please fork the repository if you would like to contribute]
If you want to just use the latest version of the toolbox without installing, download it to a local directory. See the following set of instructions on how to quickly start using PyZDDE.
-
Link to PyZDDE repository @ GitHub https://github.com/indranilsinharoy/PyZDDE
-
Download a zipped copy of PyZDDE from the above link by clicking on "DOWNLOAD ZIP" as shown in the following figure:
or just click here: [DOWNLOAD] (https://github.com/indranilsinharoy/PyZDDE/archive/master.zip)

-
For the purpose of this example, we are going to unzip the PyZDDE toolbox under C:\ drive. You may unzip it to any other directory of your choice.
-
Rename "PyZDDE-master" to "PyZDDE"

The unzipped directory structure of C:\PyZDDE looks similar to the following picture (please note that few more files might have been added since this note was created):

In order to use PyZDDE in with your scripts, you need to import the zdde module. This requires that the Python interpreter is able to find PyZDDE (the folder PyZDDE) in its search path. Normally when python packages are installed, they are added to the site-packages directory inside the main python directory (for example, in C:\Python27\Lib\site-packages\ ). Since (I assume that) you have not installed the package, you need to tell the Python interpreter about its whereabouts. This can be done in several different ways. I have described three here; please use the one suitable for you (I have used option 1 along with EPD distribution, Anaconda, and WinPython 2.7.x, 64-bit):
-
[Option 1]: If you are using any of the Scientific Python distribution EPD/Canopy, Anaconda or WinPython, then create a Windows environment variable (under the "USER VARIABLES"!!) called 'PYTHONPATH' and set its value to the directory where the PyZDDE folder resides (for example, C:\PyZDDE;). Note that you can add more than one value to this variable separated by semi-colons. If you have any doubt please see this stackoverflow answer. To verify whether or not the Python interpreter is able to see this path, open IPython QtConsole (or any other Python shell), import the systems module (
import sys) and list the path (sys.path). -
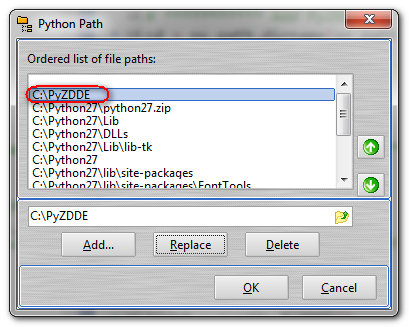
[Option 2]: If you are using an IDE such as Spyder IDE, PyScripter IDE, etc., you should be able to add the path-to-the-PyZDDE directory to the Python Path. For example, in PyScripter, select Tools -> Python Path ... Then add the path (which is C:\PyZDDE, if you downloaded and unzipped PyZDDE here) to the list of file paths as shown in the following two figures.
Add the path to the list of paths in PyScripter.
Similarly, in Spyder, you can do the same by selecting Tools -> PYTHONPATH manager. Then add the path as shown in the following two figures.
-
[Option 3]: If for any reason, you are unable to add the PyZDDE path to the Python search-path in you editor, use the following boilerplate code (shown below within the starred lines) to add the PyZDDE path at the beginning of each of your script files. You need to add this bit of code to each file as the PyZDDE path is not added permanently to the Python search-path.


#**************** Add PyZDDE to Python search path **********
import sys
PyZDDEPath = 'C:\PyZDDE'  # Assuming PyZDDE was unzipped here!

if PyZDDEPath not in sys.path:
    sys.path.append(PyZDDEPath)
#************************************************************

import pyzdde.zdde as pyz
#Create a PyZDDE object
link = pyz.createLink()
Please see the description here
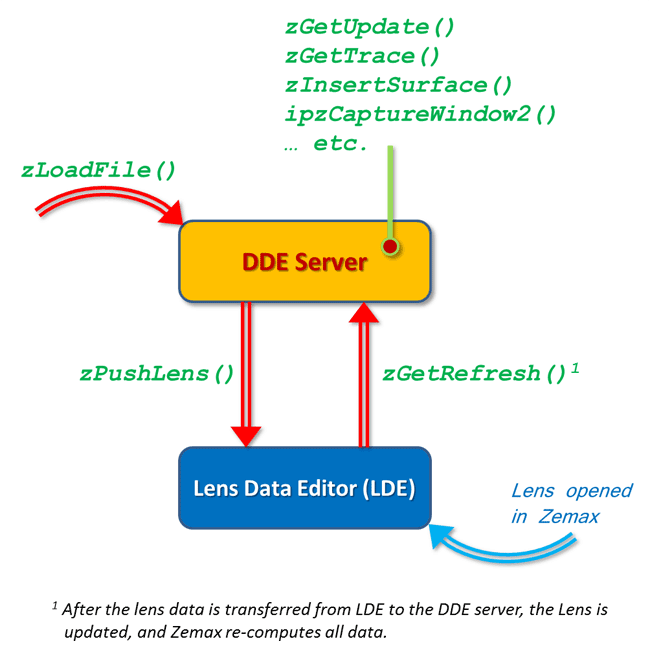
Zemax maintains a separate copy of a lens in the DDE server and all processing/modifications using any external application (including Python/PyZDDE) is done to the lens residing in the DDE server. The lens (if any) in the LDE is not modified by the DDE calls. One can of course move the lens in the DDE server to the LDE (using zPushLens) or move the lens in the LDE to the DDE server (using zGetRefresh).
The basic sequence of steps for accessing ZEMAX (the DDE server) from Python (the DDE client) are as follows:
-
Start the ZEMAX application.
-
Import the
zddemodule (import pyzdde.zdde as pyz) -
Create a DDE communication link object (
link = pyz.createLink()) in a Python script, IPython QtConsole (interactive environment) or IPython notebook. -
Now, if you want to work with a lens in the LDE, use
link.zGetRefreshto copy the lens from the LDE to the DDE server. Else, load a ZEMAX lens file directly into the DDE server using the functionlink.zLoadFile. You can of course build an optical system from scratch entirely through PyZDDE. -
Once all calculations (depending on the application) have completed, use
link.close()to terminate the DDE communication.
The figure below illustrates the above process.
Once the PyZDDE path has been added to the Python search-path, please start Zemax.
We will quickly run an example present in the PyZDDE/Examples/Scripts directory called the plotSpiralSpot.py. It is a similar to the example that one sees when using MZDDE (the Matlab Zemax Dynamic Data Exchange Toolbox written by Derek Griffith) for the first time.
The example, for which the code is shown below, demonstrate the zSpiralSpot() convenience function in PyZDDE. The zSpiralSpot() produces a series of x, y values of rays traced in a spiral over the entrance pupil to any other surface specified (the image surface in this example).
import sys
import os
import matplotlib.pyplot as plt
import pyzdde.zdde as pyz

ln = pyz.createLink()
filename = os.path.join(ln.zGetPath()[1], 'Sequential', 'Objectives',
                        'Cooke 40 degree field.zmx')
# Load a lens file into the ZEMAX DDE server
ln.zLoadFile(filename)

hx, hy = 0.0, 0.4
spirals, rays = 10, 600  # 100, 6000
xb, yb, _, _ = ln.zSpiralSpot(hx, hy, 1, spirals, rays)
xg, yg, _, _ = ln.zSpiralSpot(hx, hy, 2, spirals, rays)
xr, yr, _, _ = ln.zSpiralSpot(hx,hy,3,spirals,rays)

fig = plt.figure(facecolor='w')
ax = fig.add_subplot(111)
ax.set_aspect('equal')
ax.scatter(xr, yr, s=5, c='red')
ax.scatter(xg, yg, s=5, c='lime')
ax.scatter(xb, yb, s=5, c='blue')
ax.set_xlabel('x')
ax.set_ylabel('y')
fig.suptitle('Spiral Spot')
ax.grid(color='lightgray', linestyle='-', linewidth=1)
ax.ticklabel_format(scilimits=(-2,2))

pyz.closeLink()
plt.show()
Note that it may take about 15 seconds (depending on your system) to generate the plot shown below, in which 18000 rays (6000 for each wavelength) are plotted, one ray per DDE call. You may consider plotting fewer rays for the first try (change "rays = 6000" in the code to something fewer.)
Running the code show generate a plot as shown below:

This work by PyZDDE contributors is licensed under a Creative Commons Attribution 4.0 International License.
Based on a work at https://github.com/indranilsinharoy/PyZDDE.
