Workflow
This article assumes you are using OSX, that you've seen the command line before, that you have a Rails app and that you've installed Style Guide.
If you're new to the command line, consult the Terminal.app guide.
If you need to make a new Rails application, consult the Rails app guide.
If you need to install Style Guide, consult the install guide.
Let's say your application lives in ~/workspace/client-app for simplicity. When you see this, just mentally replace it with your application's directory.
You'll notice that there are some default Sections in Style Guide. These Sections roughly correspond to the Twitter Bootstrap Base CSS components, which is useful if you're starting your app on Twitter Bootstrap.
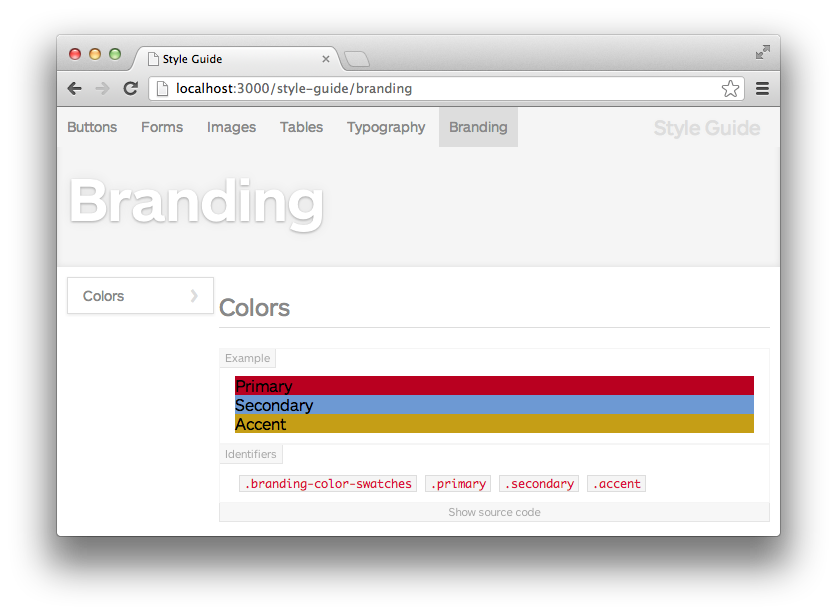
In this guide, we'll make a Style Guide section for the Branding elements of your Rails app, then add your site's color scheme.
First, we need to open a Terminal window and go into the ~/workspace/client-app directory.

Style Guide Sections are just directories in our Rails app, located by default underneath app/views/style-guide. Let's make a directory underneath that called "branding" by using mkdir -p app/views/style-guide/branding.

We now need to make a partial for your site's colors. Open up Sublime Text and put this HTML into the window:
    <div class="branding-color-swatches">
      <div class="primary">Primary</div>
      <div class="secondary">Secondary</div>
      <div class="accent">Accent</div>
    </div>
Next, save this file as app/views/style-guide/branding/_colors.erb.

We can now see this partial in Style Guide under the Branding section at http://localhost:3000/style-guide/branding.

We need to make a directory for our branding color styles to live. Let's make a subdirectory under our app's assets/stylesheets path using mkdir app/assets/stylesheets/branding.

Next make a new file in Sublime Text with Command+N. Put this into the window:
    .branding-color-swatches {
      .primary { background-color: #B90020; }
      .secondary { background-color: #6D99D3; }
      .accent { background-color: #C59E16; }
    }
Next, save this file as app/assets/stylesheets/branding/colors.css.scss.

Style Guide now reflects the updated styling!
Let's refactor our work and extract some variables. After all, branding colors are meant to be reused all over the site. Let's make a new file in Sublime Text with Command+N containing the following:
    $brandPrimary: #B90020;
    $brandSecondary: #6D99D3;
    $brandAccent: #C59E16;
Save this file as app/assets/stylesheets/_variables.scss.

Now let's use those variables in app/assets/stylesheets/branding/colors.css.scss:
    @import "variables";
    .branding-color-swatches {
      .primary { background-color: $brandPrimary; }
      .secondary { background-color: $brandSecondary; }
      .accent { background-color: $brandAccent; }
    }
When we hit save, Style Guide will update and use the variable-based version of the file. Now we can use these variables in any context we want, and they'll always be styled!