
| branch | status | release |
|---|---|---|
| master | ||
| val | ||
| production |
The new Quality Measure Reporting (QMR) application will house all the state required measures for reporting on Adult, Child, and Health Home core sets. The new application is replacing the time intensive SDF files previously used for submission. Data collected within the QMR application will be sent to the CMS partner MPR for analytics and reporting via the CollabraLink owned BigMAC application.
This application measures the quality of care and programs offered by states related to their Adult, Child, and Health Home offerings.
The new web-based QMR application will allow CMS to access data submitted by the states in real time and with more accuracy. QMR has also been designed with HCD best practices in mind and has incorporated conditional logic and validation to ensure moving through each measure provides a better user experience and ease in understanding of what is being asked.
- Quality Measure Reporting (QMR)
- Table of Contents
- Getting Started
- Testing
- Deployment
- Services
- Year End Transition Documentation
- Debugging Problems and Solutions
- Contributing / To-Do
- Slack channel
- Quickstart
- License
In order to make changes against this repo and interact with associated services, you will need an EUA account with appropriate job codes. Create an EUA user ID here: https://eua.cms.gov/iam/im/pri/.
EUA access requests may take days or weeks to process, but local development setup can continue. It is highly recommended you make your EUA requests before continuing.
Job codes needed may vary by contract and job role. Consult with your team for a complete list. The following are commonly required software development job codes.
| Job Code | Description |
|---|---|
| SLACK_P_USER | Gets you access to CMS Slack. Many of the manual processes are initiated through contacting a specific team through Slack, in addition to being a primary means of communication. |
| Github_Editor | Required for managing CMS GitHub repos. Your GitHub user will still need to be added to the CMS orgs and relevant repos through GitHub. In order to accept those invitations, you will be prompted to sign into CMS EUA. |
| CMS_CLOUD_ACCESS | Allows you to sign into CMS AWS with your EUA credentials. You will still need to be added to your project's AWS environments. See AWS section of this document for more information. |
| JIRA_Users | Access to issue tracking repository on CMS Jira. |
| ENT_AGILE_TOOLS | For Contractors and other NON-CMS employee users access to the CMS Enterprise Agile Tools |
| AWS_Splunk_User | User Level Access for AWS Splunk Application |
| CTR_VPN_3ZWINMF_Exception | One of 2 codes required for VPN access. Has a 90 day auto-expire. Needed while getting approved for a PIV. See VPN section for more information. |
| CTR_VPN_PIV_3ZWINMF | Contractor VPN_PIV access to 3-Zone URL's, Windows servers & Mainframes. See VPN section for more information. |
| CHIP_D_User | CHIP-State Childrens Health Ins Prog Enrollmnt Data Sys Dev Access |
| CHIP_P_User | CHIP-State Childrens Health Ins Prog Enrollmnt Data Sys Prod Access |
| CHIP_V_User | The CHIP Enrollment Data System is the electronic media system for the states |
Users can log into QMR's non-development environments using IDM.
CMS' Identity Management (IDM) system is an established, enterprise-wide, identity management solution. IDM is leveraged by CMS business applications across the agency. End users of all business applications that integrate with this solution can use a single set of user credentials to access any integrated application.
- Access QMR at https://mdctqmr.cms.gov and select "Register"
- Select the New User Registration button on the IDM sign-in screen
- Provide requested information on the following screens and accept terms of service.
- Enter a user ID and password, select a security question, and submit.
- Sign in to IDM at https://home.idm.cms.gov
- Select the "Role Request" tile
- Select "Medicaid Data Collection Tool (MDCT) Quality Measures Reporting (QMR)" from the "Select an Application" drop-down list
- Select the appropriate user role
- Note: An account can only be associated with one role. If you need to have multiple roles (i.e., State User and Admin User) you will need to create multiple accounts.
- Watch for an email confirming your role request submission
- View and agree to the Terms of Service. Click the "Next" button.
- Complete the Remote Identity Proofing (RIDP) form. Click the "Next" button.
- Answer the RIDP questions as applicable. Click "Verify".
- Select the applicable role attributes via the drop-down lists. Then click "Review Request".
- Enter a reason for the request in the provided text box. Click "Submit Role Request".
GitHub access can be granted by any admin on the repository, but you will need to request it first, either through Slack or through GitHub's interface.
You must have an EUA account and your request for the appropriate job codes must be approved before you will be able to access AWS. See Register an EUA Account section of this document for more information.
You must be manually added to the appropriate AWS environments by CMS personnel. That request can be made in Jira or Slack.
- Have an existing team member add you to the CMS Slack channel
#macpro-devsecops-techsupport- Not recommended alternative, but possibly effective action: yell loudly in another channel and see if a stranger will help you.
- Make a post requesting the following:
- application admin for Dev and val accounts
- read-only for production
- Someone from the DevSecOps team should give you a link to a Jira ticket, or may ask you to make the ticket.
- Follow along with the status of the ticket and provide any additional information needed. Most likely you will be asked to comment on the ticket confirming you can access AWS resources and the work is complete.
- Open a browser and connect to https://cloudvpn.cms.gov
- Enter the following credentials:
- Username = EUA username
- Password = EUA Password
- Second Password = 6-digit Google Authenticator passcode
- Click 'Continue' on the Security Banner.
- Click the 'AnyConnectVPN' link.
- Click 'Save File' from the dialogue box.
- Go to the saved file location and run anyconnect-xxx-4.5.05030 executable file
- Click 'Next' from the Welcome dialogue box.
- In the EULA dialogue box:
- Click the 'I accept the terms of the License Agreement' radio button.
- Click 'Next'.
- Click 'Install' in the Ready to Install dialogue box.
- Allow your computer to make changes if prompted.
- Click 'Finish' complete the installation.
- Open the Cisco AnyConnect client .
- Type or select 'cloudvpn.cms.gov' in the VPN field and click 'Connect'.
- Enter the following:
- Username = EUA username
- Password = EUA Password
- Second Password = 6-digit Google Authenticator passcode
- Click 'Accept' on the Security Banner.
Information on installing the AWS CLI for your machine can be found here.
Kion is the application where one can reach the different AWS accounts that they have access to. It requires For the QMR application the relevant accounts are.
- MDCT-QMR-DEV: The development account that contains all branch resources and the dev resources
- MDCT-QMR-IMPL: The account that contains our val environment.
- MDCT-QMR-PROD: The account that contains our production environment.
They can be found in the Projects tab of Kion.
Once you have configured the AWS CLI on your personal machine, if you want to access a given account locally, you will be able to.
- Log into the VPN
- Navigate to Kion
- Navigate to Projects
- Click Cloud Access
- Select the Account
- Select role for credentials
- Select Short term Access Keys
- Click the first option
- Paste the selected credentials into the development console being used.
Once this process is completed you will be able to access and deploy resources from the account and also do local deployments and destroys of serverless infrastructure.
Any secure or sensitive values used by the application are stored in the AWS Parameter Store. To access these you will need to
- Login to the specific account
- Go to AWS System Manager
- On the right hand side go to Parameter Store
- Find the Parameter you are looking for. For example the test user credentials are stored in
/configuration/testPassword1
Security Hub is an AWS service that identifies security issues in an account and requests remediation within a certain time period.
| Threat Level | Remediation Period |
|---|---|
| CRITICAL | Within 15 days |
| HIGH | Within 30 days |
| MEDIUM | Within 90 days |
| LOW | Within 365 days |
Critical and High threats will be posted as issues in the GitHub repository.
Any AWS issues that are outside the capability or access level of the team needs to either go through the DevSecOps team or through a service desk ticket.
SNOW is the ticketing service used by CMS and new tickets can be created here. You will need to be on the VPN to access SNOW. The majority of tickets will be IAM related and the turnaround time is usually about 12-24 hours between the time of filing the ticket and the first response from a human. With that in mind it's good to set aside extra time for tickets that you know will touch on IAM or new Cloud Services.
The following are prerequisites for local development.
-
Clone this repository locally
git clone [email protected]:CMSgov/cms-mdct-qmr.git
-
Install Node
-
Install Node Version Manager (NVM)
- A specific version of Node is enforced and specified in the file
.nvmrc. This version matches the Lambda runtime.
- A specific version of Node is enforced and specified in the file
-
Install the correct version of Node
# nvm commands will default to Node version defined in .nvmrc nvm install nvm use -
Install Homebrew
/bin/bash -c "$(curl -fsSL https://raw.githubusercontent.com/Homebrew/install/HEAD/install.sh)" -
Install Yarn
brew install yarn
-
Install Serverless
yarn global add serverless
yarn upgrade serverless
-
Install the following Serverless plugins
yarn add serverless-offline
yarn add serverless-dynamodb-local
yarn add serverless-s3-local

# or install simultaneously
yarn add serverless-offline && yarn add serverless-dynamodb-local && yarn add serverless-s3-local
-
Install all other node packages.
yarn install # can be skipped, will run automatically in dev script -
Set up your local ENV. The dev script will create a .env file for you at the root of the repository on your first run. There should be no changes needed. Compare with other teammates if you encounter problems.
-
Set up the UI-SRC ENV.
- Navigate to
/services/ui-src/. - Make a new file:
.env - Copy the contents of
.env_exampleinto.env- If you want to connect to real resources for the branch you can tweak these values with the resource values found in AWS.
- Navigate to
-
Run the application.
./dev localA number of test users are defined in
users.json. See the AWS section for more specific instructions and test user passwords.
This repo uses the code formatter Prettier. The package is downloaded during yarn install and is run automatically in a pre-commit hook. Additionally, the Prettier formatter can be run on file save in many IDEs or run ad hoc from the command line.
The Prettier extension can be downloaded from the VS Code Marketplace.
Once installed, open VS Code's Preferences. Search for "Format on Save". Clicking the checkbox should engage the Prettier formatter on file save.
VS Code is used almost ubiquitously across the current development team, but similar instructions are available for other IDEs.
Using this command, or a variant of it, will format all matching files in the codebase and write the changes. Prettier has complete CLI documentation on their website.
npx prettier --write . # format everything relative to the pwd
npx prettier --write "**/*.tsx" "**/*.ts" # format all TypeScript filesThe JavaScript unit testing framework being used is Jest, and the React component testing library being used is the React Testing Library.
First, make sure your node_modules are up to date:
- Navigate to tests and run
yarn install
- Navigate to tests/cypress and run
yarn install
- Set Up AWS Credentials Locally
- On your local QMR environment, navigate to
cd tests/cypress - Run
./configureLocal.sh master
The Cypress environment (.env) file will be generated and populated under tests/cypress.env.json.
Once your local environment is up and running, these steps need to be taken to set up Cypress:
cd tests/
yarn install
cd cypress/
yarn install
To run the end-to-end (E2E) Cypress tests:
cd tests/
yarn test
The Cypress application will kick off, where you can find a list of all the available E2E tests.
To run an individual Child Measure test, you first need to create these measures by running the create_delete_child.spec.ts test.
Similarly, to run an individual Health Home Measure test, you first need to create these measures by running the create_delete_healthhome.spec.ts test.
To run the Jest unit tests on the React components:
cd services/ui-src/
yarn test
To run the Jest unit tests on the API endpoints:
cd services/app-api/
yarn test
On the terminal, you will see the unit test results.
For example:

Many of commonly used components and common question components are tested with snapshot tests. Jest's documentation describes what snapshot testing is and how to interact with their tooling.
If a change is made that affects the way a component renders, and that component is covered by snapshot testing, the snapshot tests will fail. This is expected behavior. Output logs should highlight clearly the discrepancies between the rendered component and the stored snapshot. Assuming the changes are anticipated the snapshot should be updated to match the component so tests will pass going forward. See the "Updating Snapshots" section of the Jest docs for specific instructions on overwriting the snapshots. Alternatively, the old snapshot file can be deleted and will be re-generated on the next run of the test.
To view a unit test code coverage report on the React components:
cd services/ui-src/
yarn test --coverage
To view a unit test code coverage report on the API endpoints:
cd services/app-api/
yarn test --coverage
On the terminal, there will be a detailed coverage report followed by a coverage summary similar to this one:

Code Climate is a code analytics tool that measures unit test coverage, code complexity, and code readability.
It is connected to the repository and can be reached here
When logging in, choose "Login with GitHub" to connect to the appropriate repos.
The Code Climate config file is at the top level of the project and called .codeclimate.yml. This is similar to a gitignore file in that you specify file patterns to ignore for code smell and maintainability.
Right now we are only looking at the pieces of the app-api and ui-src that we have worked on.
The short version of the CICD Pipeline is Pull Request → Github Actions → Cloudformation Stacks → Accessible Application
All of the deployments start with new code on a branch. A branch environment is created and this is where automated and manual testing occurs. Once all of the checks have been passed on a branch, it is pulled into the Master branch where more testing is done and all functionality is verified. Then it is pushed to the Val Branch, where a selection of business users test the new functionality and provide a further round of feedback. Once this feedback has been addressed a final push to the Production branch is done where live users have access to the new features.
In general we do one branch for each Jira Ticket with either the ticket number or a brief description of the functionality as the branch name. Our application uses the serverless stack to deploy resources to AWS, but because of that we need to be careful about how we name the branches so here are a few rules of thumb.
- No Capital letters or special characters other than
- - No Spaces
- Keep the name under 30 characters
When writing Cypress tests for an existing branch, create a new branch and write the tests there.
For example, if the branch that needs tests is called oy2-1234, create a new branch called oy2-1234test.
When the tests have been written, create a new PR for oy2-1234test and set its base to oy2-1234. Submit this PR for review.
In order for a PR to get merged into Master it needs 2 approvals, and 1 of the approvals must be from an admin on the project. The same rules apply for Val and Prod.
When merging to Master always choose the option to Squash and Merge This helps to keep the master branch clean and you can track back individual PR's to a piece of work in Jira.
When Merging to Val or Prod, always use a merge commit.
Github Actions are defined in the .github/workflows folder.
-
precommit/prettier: This runs prettier checks on the application and fixes minor issues if found. Any major issues that can't be corrected byprettier fixmakes this step fail, and thus the whole pipeline will fail -
codeclimate: This checks several code metrics including test coverage of the PR vs the existing code. If test coverage decreases or if different criteria are violated, this step will fail and require remediation in the code climate application. -
Deploy: First runs unit tests, if any fail the deploy fails. Then goes through each service and deploys the cloudformation stack for it. The actions can also be monitored in AWS in the Cloudformation application. The Stack name will bebranch-name-service-name. That information can also be useful for debugging if your stack fails to deploy.At the end of the deploy step the cloudfront URL will be output in the logs. This is one of the ways to retrieve the url for testing on a branch.
-
Deploy Support: Deploys the connection between the Security Hub and GitHub to create new GitHub issues in the repo if any security violations are found. -
Automation Deploy: Runs all of the automation tests.
Right now the automation step does not run on the Val or Prod branches due to security restrictions around test users altering real data.
| Environment | URL |
|---|---|
| Local | http://localhost:3000/ |
| Branch | Found in the output of the Deploy step |
| Master | https://mdctqmrdev.cms.gov/ |
| Val | https://mdctqmrval.cms.gov/ |
| Prod | https://mdctqmr.cms.gov/ |

This project is built as a series of micro-services using the Serverless Framework. Serverless looks and feels like a more useful version of CloudFormation Templates, and you can even write Cloudformation inside serverless files.
Every microservice in this project has a corresponding serverless file that deploys everything in the service to a cloudformation stack in AWS. Check out The Docs to learn more about it. But we'll cover a few things here.
The following values are used to configure the deployment of every service (see below for more background and context).
| Parameter | Required? | Accepts a default? | Accepts a branch override? | Purpose |
|---|---|---|---|---|
| .../iam/path | N | Y | Y | Specifies the IAM Path at which all IAM objects should be created. The default value is "/". The path variable in IAM is used for grouping related users and groups in a unique namespace, usually for organizational purposes. |
| .../iam/permissionsBoundaryPolicy | N | Y | Y | Specifies the IAM Permissions Boundary that should be attached to all IAM objects. A permissions boundary is an advanced feature for using a managed policy to set the maximum permissions that an identity-based policy can grant to an IAM entity. If set, this parmeter should contain the full ARN to the policy. |
This project uses AWS Systems Manager Parameter Store, often referred to as simply SSM, to inject environment specific, project specific, and/or sensitive information into the deployment. In short, SSM is an AWS service that allows users to store (optionally) encrypted strings in a directory like hierarchy. For example, "/my/first/ssm/param" is a valid path for a parameter. Access to this service and even individual paramters is granted via AWS IAM.
An example of environment specific information is the id of a VPC into which we want to deploy. This VPC id should not be checked in to git, as it may vary from environment to environment, so we would use SSM to store the id information and use the Serverless Framework's SSM lookup capability to fetcn the information at deploy time.
This project has also implemented a pattern for specifying defaults for variables, while allowing for branch (environment specific overrides). That pattern looks like this:
sesSourceEmailAddress: ${ssm:/configuration/${self:custom.stage}/sesSourceEmailAddress, ssm:/configuration/default/sesSourceEmailAddress}
The above syntax says "look for an ssm parameter at /configuration//sesSourceEmailAddress; if there isn't one, look for a parameter at /configuration/default/sesSourceEmailAddress". With this logic, we can specify a generic value for this variable that would apply to all environments deployed to a given account, but if we wish to set a different value for a specific environment (branch), we can create a parameter at the branch specific path and it will take precedence.
In the above tabular documentation, you will see columns for "Accepts default?" and "Accepts a branch override?". These columns relate to the above convention of searching for a branch specific override but falling back to a default parameter. It's important to note if a parameter can accept a default or can accept an override, because not all can do both. For example, a parameter used to specify Okta App information cannot be set as a default, because Okta can only support one environment (branch) at a time; so, okta_metadata_url is a good example of a parameter that can only be specified on a branch by branch basis, and never as a default.
In the above documentation, you will also see the Parameter value denoted as ".../iam/path", for example. This notation is meant to represent the core of the parameter's expected path. The "..." prefix is meant to be a placeholder for either "/configuration/default" (in the case of a default value) or "/configuration/myfavoritebranch" (in the case of specifying a branch specific override for the myfavoritebranch branch.
As you are developing you may want to debug and not wait for the 12-20 minutes it takes for changes to go through GitHub actions. You can deploy individual services using serverless.
- Ensure all stages of the branch have deployed once through github actions
- set up local AWS credentials
- Navigate to the service you are trying to deploy ie:
/services/app-api - Run
sls deploy --stage branchname, where branchname is the name of your branch.
Destroying is largely the same process as deploying.
- Ensure all stages of the branch have deployed once through github actions
- set up local AWS credentials
- Navigate to the service you are trying to deploy ie:
/services/app-api - Run
sls destroy --stage branchname, where branchname is the name of your branch.
Some known issues with this process of destroying is that S3 buckets will not be deleted properly, so I would recommend destroying through GithubActions or destroying the entire branch.
In some circumstances you may want to remove all resources of a given branch. Occasionally there will be orphaned infrastructure that was not destroyed when the branch was destroyed for one reason or another. The process for destroying the branch
- set up local AWS credentials
brew install jqInstall jq (command-line JSON processor). This is necessary for the destroy script to run properly.sh destroy.sh name_of_your_branchRun destroy script. You will be prompted to re-enter the branch name once it has found all associated resources. (There shouldn't be any errors but if there are any. Re-running the script should fix it)
The API service contains all of the API calls for the application. It is deployed with serverless and depends on the database service to exist first. It can be updated independently from the rest of the application as long as the inital infrastructure for the application has been created. This is to help speed up local deployment and debugging of branch resources and not for updates of any of the higher environments.
Parameters are passed in by the URL in this order state/year/coreset for coreset endpoints and state/year/coreset/measure for measures and are used to determine the unique id of the dynamo record.
The only endpoints that need a body is update
create: Creates the identified coreset, and then creates all child measures corresponding to the Adult, Child, or Health Home coreset.
delete: Deletes the identified coreset, and then deletes all child measures to that coreset.
get: Returns the identified coreset.
list: Given with parameters: state/year to return all the coresets for a given state and year.
update: The body can contain submitted or status to change the status of the coreset
create: Creates the identified coreset. Right now this is only fired directly from the application when a new custom Health Home Measure is created. Otherwise it is used by the create coreset endpoint.
delete: Deletes the identified coreset. Right now this is only fired directly from the application when a new custom Health Home Measure is created. Otherwise it is used by the delete coreset endpoint.
get: Returns the identified measure
list: Given with parameters: state/year/coreset to return all measures corresponding to a given coreset.
update: The body can contain data, status, reporting, description, detailedDescription
The Kafka Queues we link to are in the BigMac account and are currently not being used for any downstream purposes
postKafkaData: Fires when an update to the database happens and syncs kafka to reflect the current state of the database.
forceKafkaSync: This can be manually triggered to force kafka to reflect the current state of the database.
convertToDynamoExpressionVars: Dynamo requires very specific variable naming conventions which are unwieldly to interact with so this util will take all of the arguments and converts them into a dynamo readable version.
A known issue with this utility is that right now it only ands arguments, so if you have a list or get query that needs to exclude characteristics, this utility will need to be updated
createCompoundKey: creates the dynamo key for the coreset or measure based on the passed in parameters.
measureList: A list of all of the measures and the type of coreset they belong to. This is used when a new coreset is created to create new measures for that coreset.
We are using DynamoDb for our database solution for QMR. When looking for the databases in AWS search for branchName-tableName to find the tables for your branch.
coresets: Takes a compound key containing a unique combination of state, year, and coreset ID.
measures: Takes a compound key containing a unique combination of state, year, coreset ID, and Measure ID.
In order to run dynamodb locally you will need to have java installed on your system. If not currently installed go here: https://java.com/en/download/ to download the latest version.
If you want to a visual view of your dynamodb after the application is up and running you can install the dynamodb-admin tool from here: https://www.npmjs.com/package/dynamodb-admin
To run the dynamodb gui, run DYNAMO_ENDPOINT=http://localhost:8000 dynamodb-admin in a new terminal window
From here you can view the tables and perform operations on the local tables.
The stream functions fire deltas when updates to its table happens. These changes are picked up in the API where these changes are communicated to the kafka streams for the application.
The UI Service creates the URL's associated with the application and the cloudfront logs that monitor traffic.
For Master, Val, and Prod these URL's end with .gov the branch URL's end with .com
The Endpoints created by a branch are random and can be found in the output of the cloudformation stack for the UI, it can also be found as an output of the deploy step of our github actions.
The UI Auth service creates and manages the Authentication of the UI.
User data is synced from IDM to Cognito to allow for login to the application and the IDM roles are used to determine what a user has access to in the UI.
Okta is the Federated Identity Provider being used to allow users to use their IDM credentials with our application.
There is one lambda function in the UI-Auth Service, this is to create test users that can login to the branch environments, dev, and Val, for testing, but not production.
To add new users with new attributes, you can edit the users.json
The ui-src service contains all of our frontend code and is therefore the largest service in the project. Our project uses the React Web Framework, Typescript, Chakra-UI for components, react-icons for various icons in the application, and react-query
| Technology | Use | Reason |
|---|---|---|
| React | Library for writing UI Components and Application Organization | We went with React because the majority of the team was comfortable with it, and the quickstart from which this application was forked came with a good React Skeleton |
| Typescript | Maintaining and enforcing types throughout the application | JavaScript does not throw compile-time errors for types which can lead to extremely difficult debugging. It also helps enforce code quality. Typscript's plugins with IDE's also make local development faster and easier by autofilling pieces for known types. |
| Chakra_UI | Rendering UI components and page Layout | We went with Chakra over material because we did a test. We chose one simple component and created it first with Material and then with Chakra. We found that chakra was far easier to develop with so we went with chakra |
| React-Icons | Simple Icons throughout the application | It was free, easy to use, and had all of the icons we needed |
| React-Query | State management | It was the more lightweight option and was more simple to plugin to the application compared to its competetors |
At it's core QMR consists of several small simple components in /services/ui-src/src/components
These are then used to create more complex components in /services/ui-src/src/measures/year/CommonQuestions
These complex components are then used along with some of the simple components to create the forms for the application in /services/ui-src/src/measures/year
When creating a new form it's best to find an existing form that is as close to what you are trying to make as possible, then modifying it with complex components if necessary, or creating a new complex component and modifying it with simple components if necessary etc...
The Uploads service consists of a few S3 buckets and some integration functions. It is the only point where the downstream applications owned by Mathematica interact with our application. This is in two buckets.
- Uploads: This is where attachment files are stored
- DynamoSnapshotBucket: This is where snapshots of our dynamo database are stored as JSON objects for Mathematica to download.
Any uploads are first stored in an inaccessible folder until they are scanned by the anti-virus scanner. Antivirus definitions are updated daily. This is to prevent anyone from uploading malicious files.
The IAM roles that we receive from Mathematica are stored as SSM parameters and can be accessed and changed in the corresponding AWS account.
Go into the services/ui-src/src/measures directory and one should see past years as
folders (2021, 2022, etc.). Ideally, changes to measures would be made from the previous
year to the next so one would make a copy the folder of the most recent year and rename
it to the next year (e.g. 2021 -> 2022). Then go into the folder and make any additions
or removals of measures as needed per requirements.
Once the directory for the new year has been made there are a couple of changes one needs to make in order to get that year working.
-
Go into the
index.tsxfile for the directory you just created (services/ui-src/src/measures/2022/index.tsx) and update the name of the export (twentyTwentyOneMeasures->twentyTwentyTwoMeasures) -
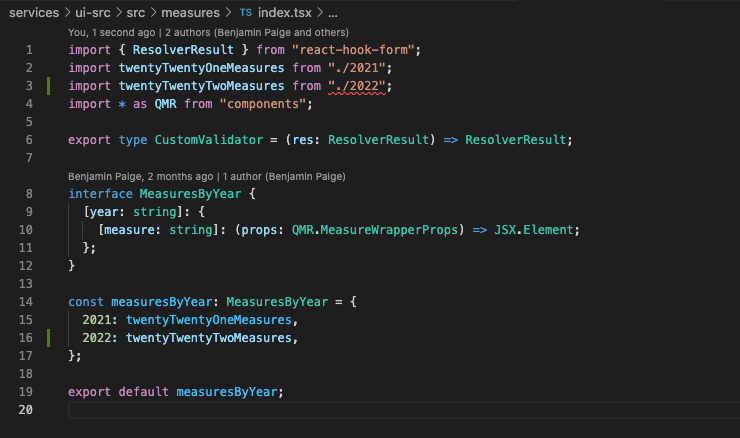
Go to the
services/ui-src/src/measures/index.tsxfile and add that new export (before and after shown below)Before

After

-
Go to the
services/app-api/handlers/dynamoUtils/measureList.tsand copy the array of measures from the previous year and copy them into the new year. Make any additions or removals of measures as needed per requirements. -
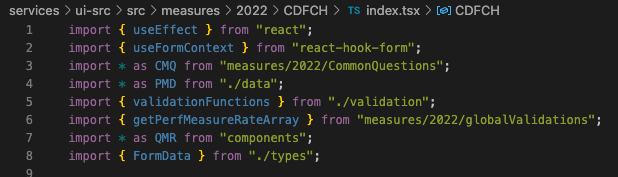
Update any import names from the past year to the latest year (e.g. 2021 -> 2022)
Before

After

-
Copy over the
/globalValidations,/CommonQuestions, and/Qualifiersdirectories to the latest year -
Similar to Step 4, update import names from the previous year to the most recent year
Before

After

-
In
services/ui-src/src/libs/spaLib.ts, copy over the prior year's entry into the array. -
In
services/ui-src/src/measures/measureDescriptions.ts, copy over the prior year's entry into the array.


If you are creating a new shared component (e.g. files under /globalValidations) while editing the previous year's files, it is possible that merge conflicts will arise. Make sure these concurrent changes are not overwriting or removing necessary code.
See current open issues or check out the project board
Please feel free to open new issues for defects or enhancements.
To contribute:
- Fork this repository
- Make changes in your fork
- Open a pull request targetting this repository
Pull requests are being accepted.
To enable slack integration, set a value for SLACK_WEBHOOK_URL in github actions secret.
To set the SLACK_WEBHOOK_URL:
- Go to https://api.slack.com/apps
- Create new app : fill in the information
- Add features and funtionality----Incoming webhooks--- activative incoming webooks--- Add new webhook to workspace.
- copy new webhook url and set it as SLACK_WEBHOOK_URL in github actions secret.
Please join the cms-mdct-qmr slack channel to get all build status and also contribute to any ongoing discussions.
This application was forked from the Quickstart Repository and efforts are made to feedback any applicable changes to that repository from this one and vice versa.
See LICENSE for full details.
As a work of the United States Government, this project is
in the public domain within the United States.

Additionally, we waive copyright and related rights in the
work worldwide through the CC0 1.0 Universal public domain dedication.