HoN Script Editor is a module for the NetBeans IDE. The idea is to make the life of scripted easier by offering various useful tools (code completion, code validation, project management, etc.). You can see some screenshots in the "How to use" section.
This editor is not related in any way to S2Games, this is an unofficial editor I personally made.
This version of the editor is far from finished, since this was not fully tested, DATA LOSS should not happen, but is not impossible! Backup all of your work before and while using this module. If you find any bugs or have any suggestion, you can simply post in this thread.
To make sure everything works, follow those steps carefully.
- Download and install Java from http://www.java.com if you don't have it.
- Download and install NetBeans IDE 7.0.1 from http://www.netbeans.org.
- You can download any version of the IDE, the IDE will download any missing dependencies when installing. So you can choose the lightest one (PHP) if you simply want this module and nothing else.
- Download the most recent version of HoN Script Editor module (link in the download section)
- Start up Netbeans.
- In the "Tools" menu, click on "Plugins".
- On the "Downloaded" tab of the plugins window, click on "Add Plugins...".
- Get to the org-hon-editor.nbm file you downloaded on step 3 and select it.
- You should now see the HoNScriptEditor module in the list. Make sure it's marked for install and then click on "Install".
- You will be warned that the module is not signed. Simply click on "Continue". Restart the editor if asked to.
You are now done with the installation! Please read the next section to get started.
You can't create a new HoN project, you can only open existing project, so follow this to be able to open a project.
- In NetBeans, go to "File" -> "Open Project...".
- Go into your HoN directory.
- You should see your "game" folder with a HoN logo, click on it and then press the "Open project" button.
This is now your working directory for all your HoN maps/scripts.
If you want to "create" another HoN project, simply create an empty resources0.s2z file in another folder and then open it as a project in NetBeans. You will be able to open any folder with a resources0.s2z file as an individual project in NetBeans.
When in a ".entity" file, you will be able to get "code completion" if you pres ctrl+space. Doing so will provide you with a list of elements/attributes that you can place at the location you are. It will also provide some information/documentation about the element your are selecting in the list.
The code completion is done with the help of a XML schema file that is included in the module installation, but to keep it up to date, you will probably need to download newer versions from this thread. For instruction on how to change the XML schema file used for code completion, see the "How to - Options" section.
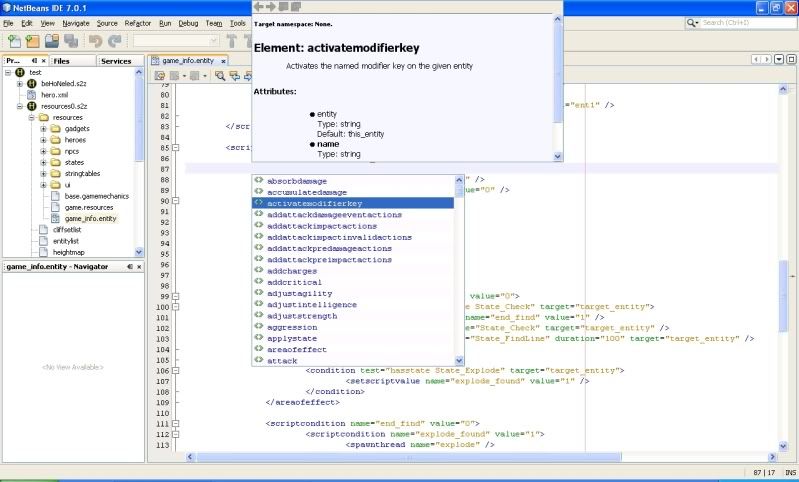
Here is a screenshot of what code completion looks like:
In the picture above, we can see a lite of actions I can add at my cursor location. The Documentation panel at the top of the list display the a description of the element I have selected in the list. It also contain the list of attribute the element can have. The attribute list on the panel: the attribute name, its "type", its default value if available and then a short description of the attribute if there is one (there is none in that screenshot). Notice that the attribute "name" is in bold, that means its a required attribute to the element (its required for it to work).
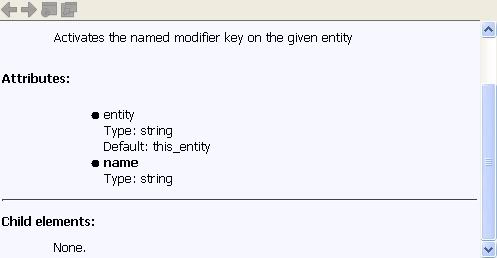
There is also a list of children an element can have at the bottom of the documentation panel:
For this element, you can see that it has no child and that will probably be the case for most actions. On some action, you will see that you can have children, which can help to identify actions that can execute code for specific pattern like conditions, compare, areaofeffect, etc.
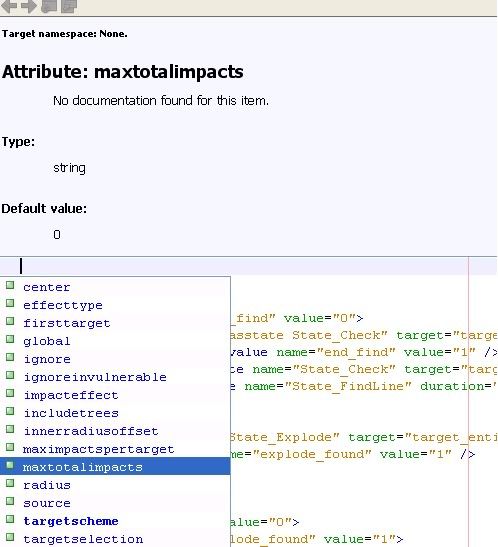
As for an attribute completion, here is a screenshot for the "areaofeffect" action:
Here you can see in the completion list that "targetscheme" is in bold. This is because I am missing it in my element and that it is required by it. As for the documentation panel, you have a short description for the attribute if available, its type and then a default value if it has one. In this case the default value is "0" (unlimited number of impacts) even if I don't set it.
There is two validation tool available for entities files. One is the "XML check" and the other is "XML validation".
The "XML check" tool can be used to detect basic XML error like a missing closing tag.
The "XML validation" tool will not only do basic XML error detection, but will also do a validation of your XML file on the XML schema. This mean that it will also detect if there is a typo in an attribute, if an action is miss placed, if you are missing required attributes and more.
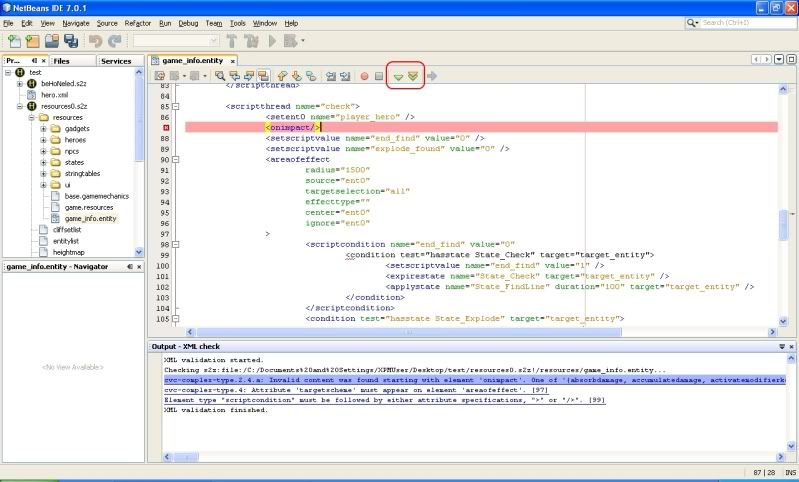
Here is a picture of the "XML validation" tool in action:
In the red box at the top is the two validation tools. The one to the left is the "XML check" tool and the one to the right is the "XML validation" tool. In that picture the tool used is the "XML validation". The result of the validation is shown in the "Output - XML check" window at the bottom. Here I have 3 errors:
- <onimpact /> event can't be placed here.
- <areaofeffect /> action is missing a required attribute named "targetscheme".
- The <scriptcondition /> action is missing a ">" at the end.
At the end of each error you have the line number and clicking on the error will mark the line in red in the editor as shown in the picture for the error.
The "XML validation" tool might something return error on lines that you know works. That is either because your schema file is out of date and you should update it or that the official documentation I based my schema on is wrong. If you still get the error after updating, then report it in this thread. Since the schema I made is based on the inaccurate and incomplete documentation we have, then it might return false positive in some case, but it will most of the time save you a lot of time for basic error.
For now there is only one option you can change for the module, but more might be added in the future.
To get to the module options go into the "Tools" menu, then "Options".
In the "Options" window, click on the "Miscellaneous" icon. You should now see a tab named "HoN Editor", clicking on it will show the options for the module.
Here is a picture of it:
The "Schema path" option is the path to the file that is used for code completion and validation. If its not set, the module will use the file that came with the installation. You will, at some point, need to update your schema file. So you simply need to download the most up to date file from this thread and then set its path here. Take note that if the file that is set here is not found, the module will load its bundled schema file.
Q. I'm trying to create a HoN project, but I can't find it in the list of project. A. You can't create a HoN project, you can only open up existing projects and that is a folder that has a resources0.s2z file in it. Read the How to - HoN project section for more informations.
Q. Can I use your schema file for my own project? A. You can use the schema file how you want but I would still like to have some credits for it since it took me a lot of time to make.
Q. Can I help you with anything? A. For now I'm mostly looking for feedback more than anything. Giving out suggestion, bug report is the only thing I need right now (unless you could provide me with a more accurate official documentation).
To the NetBeans community for their wonderful documentation/tutorial/wiki. To TrueZIP (http://truezip.java.net/) for their nice library!


