Creating a simple map
This tutorial will show how to create a simple map in GSHTML5. For full map reference, check this doc.
In order to create and manipulate maps, download and install Tiled, it's free and open source.
After installing Tiled, make sure you installed lib json1 plugin which allows saving maps in 1.1 version. Gshtml5 only supports map files with 1.1 version or lower, but you can use any Tiled version you want since you save maps in 1.1. Go to Edit > Preferences, then click on plugin tab. After it, check the json1 plugin.

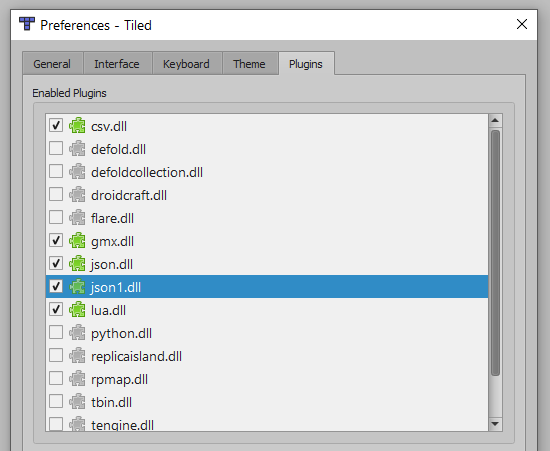
That's it, the plugin is installed. Perhaps you need to reopen Tiled.
In order to create a new map, click on File > New > New Map...:

Set the size of the map and the size of the tile:

The best tile size for gshtml5 engine is 16x16. Everything will work as expected with this size. But if your tileset uses 8x8 tiles, for example, you may want to choose 8x8 here, then in Tiled Map Properties you define
real_tile_widthandreal_tile_heightto 16, so in-game, tiles will have 16x16 size. Please check more details here.
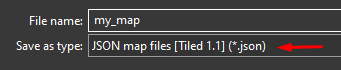
Click on Save As..., choose a location to save the map, and make sure you selected JSON map files [Tiled 1.1] (*.json) as the file format. You need to make sure that this option is set every time you save the map. Normally, if you set it and keep the map file open, you don't need to set it again, but if you close the map in Tiled, then open it again, you need to reset it on Save As.
Click on New Tileset...

In the New Tileset window, browse for your tileset image, choose the correct tile size and make sure you checked Embed in map.

Now you should see your tileset in the Tileset panel:

Create layers as much as you need:
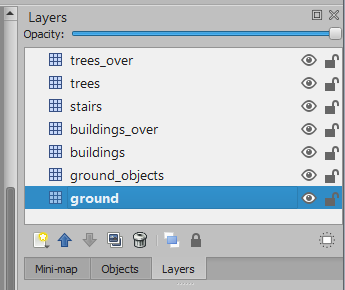
Don't forget to create separate layers for objects that will be over the player character.
Use the following tools to add the selected tiles in tileset panel into the map canvas:

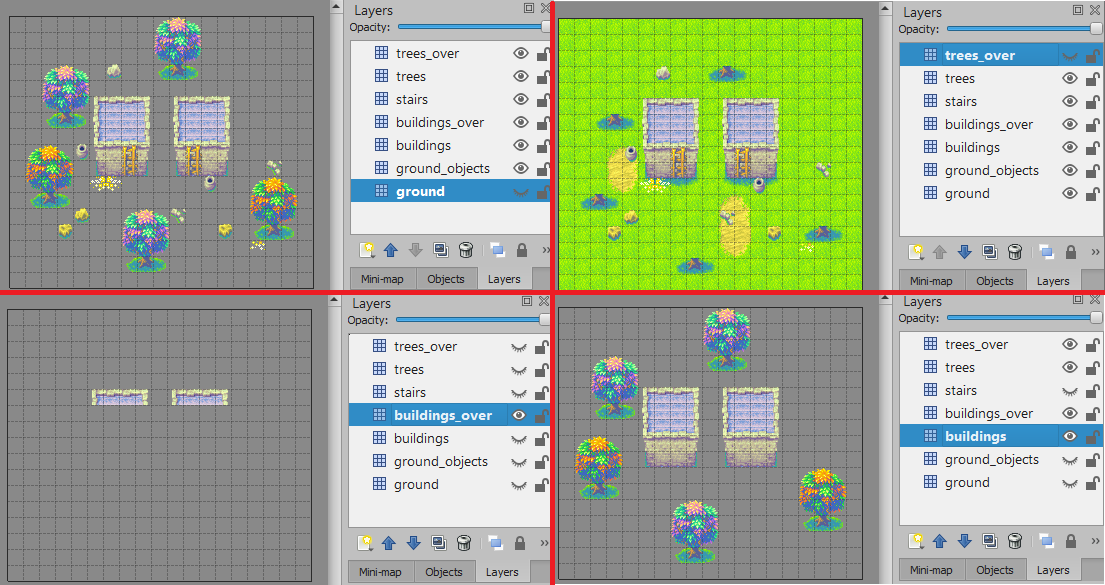
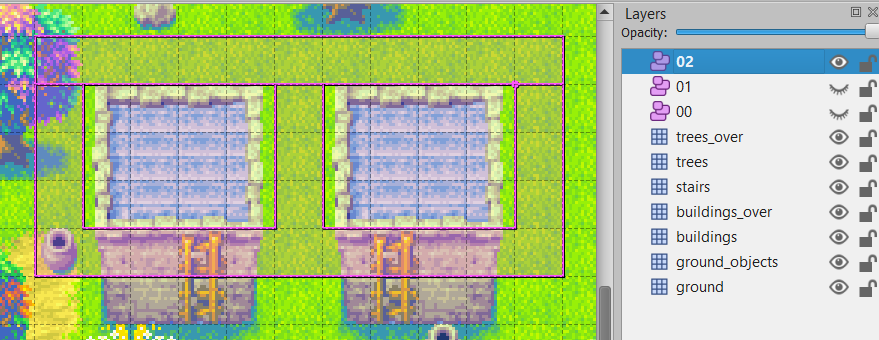
For this tutorial, I created this mini-map:

Set the over custom property for the layers that are over the player character. In my example, layers trees_over and buildings_over will have this property. Since it's ok for trees_over to always be over the player character, I can create over property as a boolean type and check it:

GSHTML5 can have different collision layers, when building a map, you may want to have different collision structures in your map. If you get over a house, you need to change the collision structure of the map because now you want the player character to walk "through" the house, also the house tiles now should be below the player character, not over. That's the case of buildings_over layer, I want it to be over only when the player character is in the first collision layer (index 0). The over property can also be an integer number so you can specify after which collision layer index you want the selected layer to be under, in my case, the collision layer 1:

For full explanation regarding the over property, please check this page.
As explained earlier, GSHTML5 can have different collision layers. By default, object layers are treated as collision layers, so every object you add to it will become a collision structure. If no extra property is passed to these layers, the object layer must have its name set as a value convertible to a number, this number will represent the collision index of the layer. Always start from 0 index.
Use the following tools to manipulate objects in the map:

GSHTML5 only supports rectangles, circles, and polygons.
First collision layer example (I used circles and rectangles):

Second collision layer for ladders. It's a good practice to have a separate layer for them. I colored the layer with red to make the difference more clear, but it has no effect in the game:

Third collision layer example, I used a polygon and a rectangle:
- Avoid creating structures thinner than 1 tile.
- Always try to snap the structures to the grid.
- Hold CTRL when creating a structure.
- Hold CTRL when moving a structure.
- Hold ALT when resizing a structure.
- Avoid complex polygon structures with a lot of vertices.
- Don't create multiple structures that result in overlapping edges where the hero can contact.
- Avoid edge inclination angles different than 45°.
- Don't use self-intersecting polygon.
- Avoid building huge maps. If this is the case, splitting them into multiple Tiled files can be an option.
In order to jump from one house to another and also climb the ladder, it is necessary to add some tile events. This class of events is placed in some specific x-y position on the map and is generally fired when the hero reaches this position. Tile Events can be set through Map Custom properties. In top menu bar, click on Map > Map Properties.... In the left side panel where are all map properties, under Custom Properties, add new properties of string type. Each property is going to be a tile event. The map property key must be in the following format: tile_event/<unique_key_name>. In order to see full details about it, check this link.
For this example, I will place the following events (J for Jump Event, C for Climb Event, a total of 14 events) in the below tile positions:

Example of a map custom property content for a Jump Event:
{
  "type": "jump",
  "x": 8,
  "y": 5,
  "activation_directions": "right",
  "activation_collision_layers": 2
}
Example of a Climb Event:
{
  "type": "climb",
  "x": 7,
  "y": 10,
  "activation_directions": "up",
  "activation_collision_layers": 0,
  "change_to_collision_layer": 1
}
All events set:

You can always check tile x-y positions and events placement by pressing G to enable grid debug mode. Use the mouse pointer to check the tile positions in-game. Tiles that have events will be painted in yellow.
Now our example map is done!
Now you just need to register your map in maps_db.json, you can check details about this file here. But for now, just adding the below is enough:
{
  "name": "Madra",
  "key_name": "my_map",
  "bgm": {
    "key": "madra_bgm",
    "path": "assets/sounds/bgm/little_madra.ogg"
  },
  "tileset_files": {
    "image": "assets/images/tilesets/madra.png",
    "json": "assets/maps/madra/my_map.json"
  }
}
Setup your init.json to start in this map and have fun:
