-
-
Notifications
You must be signed in to change notification settings - Fork 176
User Help
- What is Cboard?
- Registration and login
- Price
- Features
- Settings
- Talking
-
Board Editing
- How do I create an empty board?
- How do I personalize an existing board in Cboard?
- Can I use my own pictures when editing a board?
- Can I change the ordering of the elements in a board?
- How do I select multiple elements to edit?
- How can I find new symbols when I am editing a tile?
- Can I place board tiles in fixed positions?
- How do I set a specific number of rows and columns in my board?
- Export and import
- Display capabilities
- Scanning
- Communicator builder
Cboard is a free web application for children and adults with speech and language impairments, facilitating communication with pictures and text-to-speech.
To register for Cboard, begin by following the steps on the Welcome page where you will find a choice of logins.
If you are a new user, press SIGN UP, and a short form will pop up asking for basic information in order to create your account.
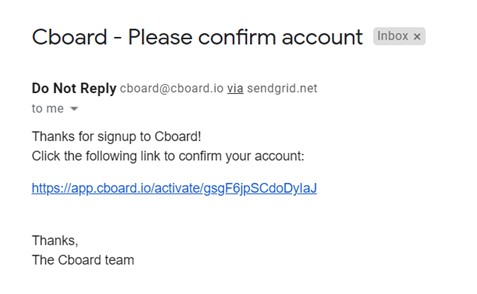
Once you have filled out this information, you will receive an e-mail shortly after with a link to follow in order to confirm your account.
This information is only held by the company to support use of Cboard and offer help when necessary. It is not shared with other organizations, (See Privacy details).
Once you have verified your account you will have access to Cboard, and will receive another e-mail confirming you were successfully verified your account.
Yes! On the login page, you will be given the option to sign up with your Google or Facebook account if you wish to do so. You can also register with an e-mail address.
To log in to Cboard, you follow the first step used to sign up, but instead of selecting SIGN UP on the Welcome screen, select LOGIN. You will then be asked to provide the e-mail you initially signed up with, and the password you set up.
Once you login to Cboard, you can access different options to configure and develop the Communication Board provided when Cboard is in unlocked mode. See the list of all the key options below:
You can log out by selecting the settings icon, and the option will appear in red. You can also select the lock symbol on the right corner, click three times and once you unlocked the screen and the red bar appears, select the icon to the left of the lock (your picture if you have one loaded) and the option to log out will appear in red.
A registered user is able to personalize their boards, and the changes made will be saved to their account so that when they log back in, they can use their customized boards. A non-registered user won't be able to save changes safely. We recommend registering just in case, so your changes are guaranteed to be saved.
To update your user information, follow the same steps you would use if you were trying to log out. Select the lock symbol on the top right corner of the board – three clicks or taps, and once you unlock the screen, select the icon to the left of the lock (user name initials, photo), and you can then edit your user information.
In order to reset your password, please e-mail [email protected] and we will get back to you.
Cboard is completely free of any charge.
Cboard is available online using a wide variety of devices, including desktops, tablets and mobile phones using Mac, Windows and Android operating systems. It is best viewed in browsers such as Chrome, Firefox, Edge and Safari and an Android app is available from Google Play.
Because Cboard is a web based app it will respond to the settings provided by the individual browsers. This may mean you have different results to the settings provided by Cboard. For example you may find different speech options being offered.
Don’t forget you can also use browser magnification or zoom to a certain degree depending on the computer, tablet or phone screen size.
Please ask Cboard about using high contrast mode for those with visual impairment as browser based options are not helpful when using this type of web app.
Cboard comes with support for 33 languages. To select a different language go to SETTINGS – select LANGUAGE and those available will appear. Make a choice and a ‘tick’ will appear beside the language.
Yes, Cboard uses the synthetic speech output available on your device to read out individual labels found below each symbol as they are added to the message output box. You can select a complete message and it will also be read aloud. If a personalised recording of a sound, word or phrase has been added to a symbol (instructions under Talking – Voice Recordings) you will hear that recording instead of the synthesised voice. This can be very helpful where a translation is not available in a language, a child’s voice is needed or an accent is unacceptable. Please ensure web access has been given to your microphone.
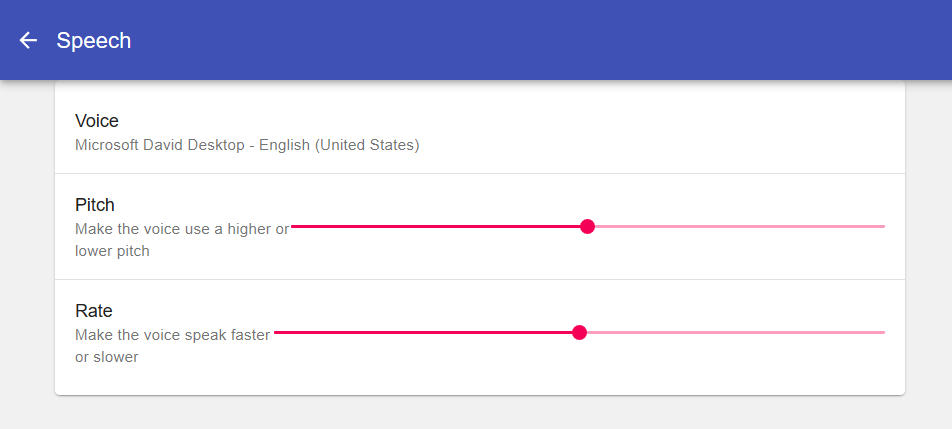
In order to adjust speech capabilities, go into SETTINGS, and under the LANGUAGE category is the SPEECH category. When you select SPEECH, you will be able to edit the pitch and pace of speech on Cboard.
Both options to export are within SETTINGS in the SYSTEM category, below Language and Speech. The EXPORT category will give you the option to upload either an OpenBoard or PDF. The IMPORT category will open your saved files once you select RESTORE.
Display settings can be edited in SETTINGS, within the SYSTEM category. The Display option is right below Export and Import. One you select DISPLAY, you can change the UI size as well as the app Font size by selecting the size you want. The red dot should be under the size you want to choose.
Use the NAVIGATION section to edit and facilitate the way you use to move around Cboard and delete symbols in the message box. Navigation at the end of the SYSTEM Category in SETTINGS allows you to have a larger ‘back’ button that is easier to select. It is also possible to allow a delete (‘x’) button to appear above each symbol as they are presented within the message box. This can make it easier to delete symbols within a sentence. But be aware of user needs as it can also confuse some individuals.
In order to edit and facilitate navigating through Cboard, select NAVIGATION, the last menu item within SYSTEM (all in Settings) allows you to add certain details to make using the board easier. The first option within Navigation allows a larger ‘back’ button that is easier to select because of the size. The second adds an ‘x’ button to make it easier to delete symbols, and the third makes it easier to unlock by requiring only one click to unlock settings.
Once you log in to Cboard, the HOME page will open.
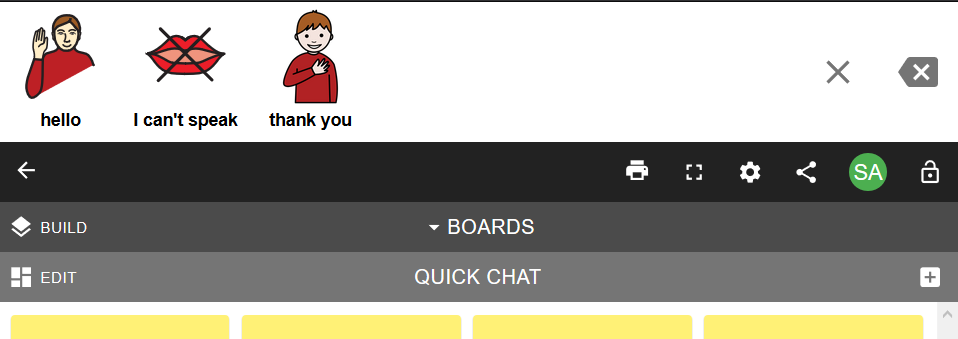
In order to access SETTINGS, select the small lock on the right-hand side three times, below the arrow. Once you have done this, a grey bar will appear below the black HOME bar, and the ‘settings’ button will appear directly to the left of the lock on the HOME bar, the second from the right.
To print your board, press the printer logo on the left hand side of the black HOME bar, after having unlocked the HOME page. An Adobe Portable Document (.pdf) will be downloaded to your technology.
In order to see Cboard in fullscreen, unlock the screen by pressing the lock symbol on the right hand side, and then on the highest row (the black bar), the second symbol from the left that looks like a rectangle expands the screen.
To share a board, unlock the screen by pressing the lock symbol on the right hand side, then on the highest row (the black bar), the third symbol from the right gives you the option to share your board on either email, Facebook, Twitter, or copy the link to send to someone.
-
Go to the board you want to use.
-
Unlock the board using the lock on the right hand side.
-
Select the EDIT button on the left hand side.
-
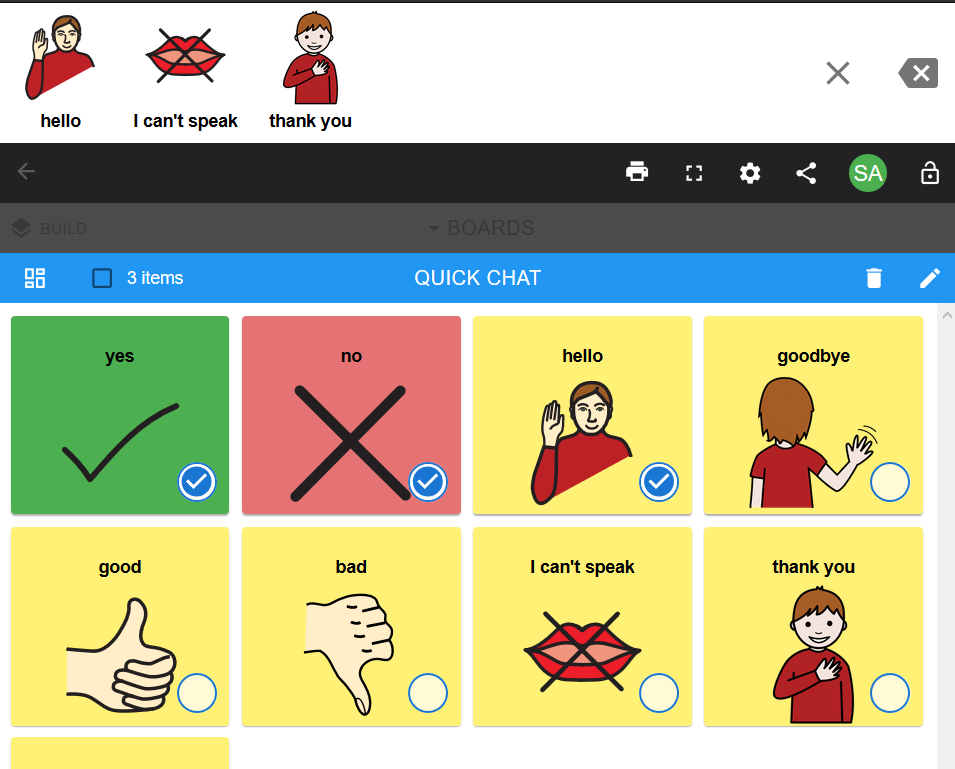
Choose which symbol cell or tile to which you want to add a voice recording. Once you select the tile or a series of tiles, a blue tick will appear in each one and they will be highlighted.
-
Select the PENCIL icon on the far right side on the light blue bar.
-
Once the tile opens, you are given the option to use a voice recorder to add a sound, word or phrase etc.
-
Add the label for the vocalisation
-
Finally select the microphone symbol and record, you can record multiple times and can play it back before saving it to the board.
If you have selected multiple symbols use NEXT to go to the next symbol and repeat the process.
In order to adjust speech capabilities/voice, go into settings, and under the LANGUAGE category is the SPEECH category. When you select SPEECH you will be able to edit the pitch and pace of speech on Cboard. You can also record your own voice for the symbols following the steps on the answer for “How do I add a personally recorded voice to symbols on Cboard?”
In order to adjust speech capabilities/voice/sound, go into SETTINGS, and under the LANGUAGE category select the SPEECH category. You will then be able to edit the pitch and pace of speech on Cboard.
In Cboard an empty board is equivalent to a folder.
If you want to create a new or empty board you have to create a new folder, and that will create a new board in the Cboard storage area (which you can see when you go to BOARDS on the middle bar in edit mode).
The new empty board will be immediately available for editing and can be set as the root board (using the build button), which means that it will be the first board you see the next time you open Cboard.
To create a new folder, begin by unlocking the screen selecting the lock button on the right hand side. Once you unlock the screen, select the plus (+) symbol on the right hand side, in order to ADD TILE. You will then be given the option to add a Tile / BUTTON which is the first and automatic option or select the FOLDER This action makes a NEW BOARD to which you can add more tiles and folders.
Once you have named the folder you can upload an image in a similar manner to making a tile with a color setting and label. This new folder will automatically link to a board above it (if included a row of tiles). It will appear in your list of boards as an empty board until it is populated with symbols and labels.
In order to personalize an existing board, select the LOCK on the top right hand corner of the bar above the board, (below the arrow with a cross). Once you have done this, another bar will appear below the black HOME bar, and you will find a small block (EDIT) icon on the left hand side to add a tile or cell. Once the block is selected, the grey bar should turn blue, and on the right hand side you will see a small trash can and a pencil.
In order to personalize the board, select the pencil and you will be able to change the label, upload an image, and add Vocalization.
Yes, you can use your own picture when editing a board. In order to use your own picture, you can upload the image when you create a new tile (by selecting the PLUS SIGN (+) on the grey bar after unlocking the page). You can also edit an existing tile with your own picture.
Yes! When you are editing a board, unlock the screen using the LOCK symbol. Then select the EDIT block icon on the left hand side (below the BUILD icon). You can then drag the pictogram/symbol or folder to wherever you want to put it within the same board.
The same way you change the ordering of elements in a board, but instead of selecting and dragging, you choose the circle inside the pictogram/symbol square. To edit many symbols you can choose more than one. After doing so, select the PENCIL icon on the right hand side and this will allow you to edit the elements selected.
Select the EDIT block icon on the left hand side of the board bar and choose the pictogram/symbol you wish to change. Select it and once the blue ring has a tick, go to the PENCIL icon on the right. Having selected the pencil you will notice that there is a MAGNIFYING GLASS icon for symbol searching. When the search feature is activated you will see SEARCH SYMBOL LIBRARY in an edit bar. Type in the concept / label / word you are looking for and symbols will appear. Once you have selected one symbol it will automatically return you to the edit TILE page.
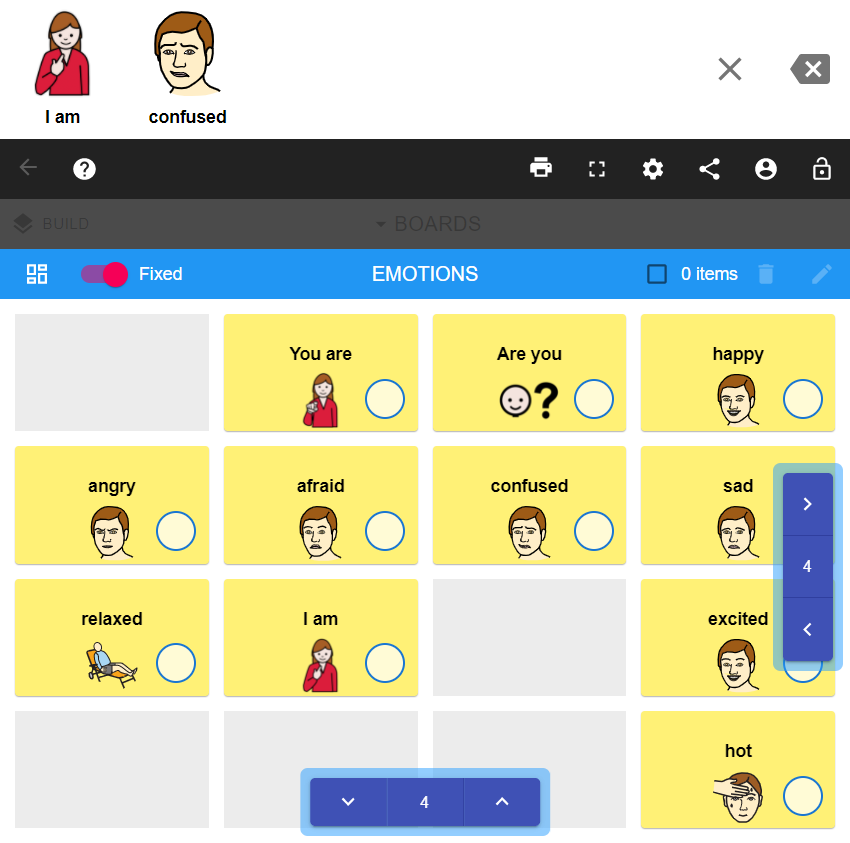
By default, when a new board is created, Cboard will add a fluent board. Anyway, it is possible to transform the board into a fixed board. They have the following features:
- The grid will not change for different screen sizes or device orientation.
- The number of rows and columns are configurable.
- The tiles will have fixed positions in the grid.
To convert a board into a fixed board, simply edit the board and switch the option in the toolbar to make it fixed. Your board will change its appearance and the rows and columns indicators will be displayed.
First, you have to transform the board into a fixed board (see previous topic). In edition mode, your board will display rows and columns indicators. You can interact with these controls in order to increase or decrease the number of rows and columns you want.
In order to export your board in Cboard, go to SETTINGS, and as soon as you open Settings, the EXPORT option will appear as a downward facing arrow, below Language and Speech.
Select EXPORT, and download your Cboard by selecting either OPENBOARD or EXPORT.
In order to import a board, follow the steps used to Export. IMPORT is below Export, an upward facing arrow with a horizontal bar below it.
In order to Import and Export boards you have two options:
- Use Cboard native file boards.
- Use OpenBoard formatted files. Learn more about Open Board Format
Display settings can be edited in SETTINGS, within the SYSTEM category. The Display option is below Export and Import. Once you select DISPLAY, you can change the User Interface (UI) size as well as the app Font size by selecting the size you want. The red dot should be under the size you want to choose.
Yes! You can resize Tiles or Buttons in SETTINGS. In the category SYSTEM, select DISPLAY and you will be given 3 options for size: Standard, Large, Extra Large. See figure below:
Scanning is where the items in the selection set are presented sequentially over time and the user makes a selection indirectly, usually by switch access. SCANNING on Cboard works within SETTINGS and the SYSTEM category. There are different settings for scanning. You should first enable the scanning setting by selecting ENABLE. You can then choose the time delay, as well as the method (either automatic or manual). Please be aware that when using a tablet or smartphone, it may also have its own built-in scanning option.
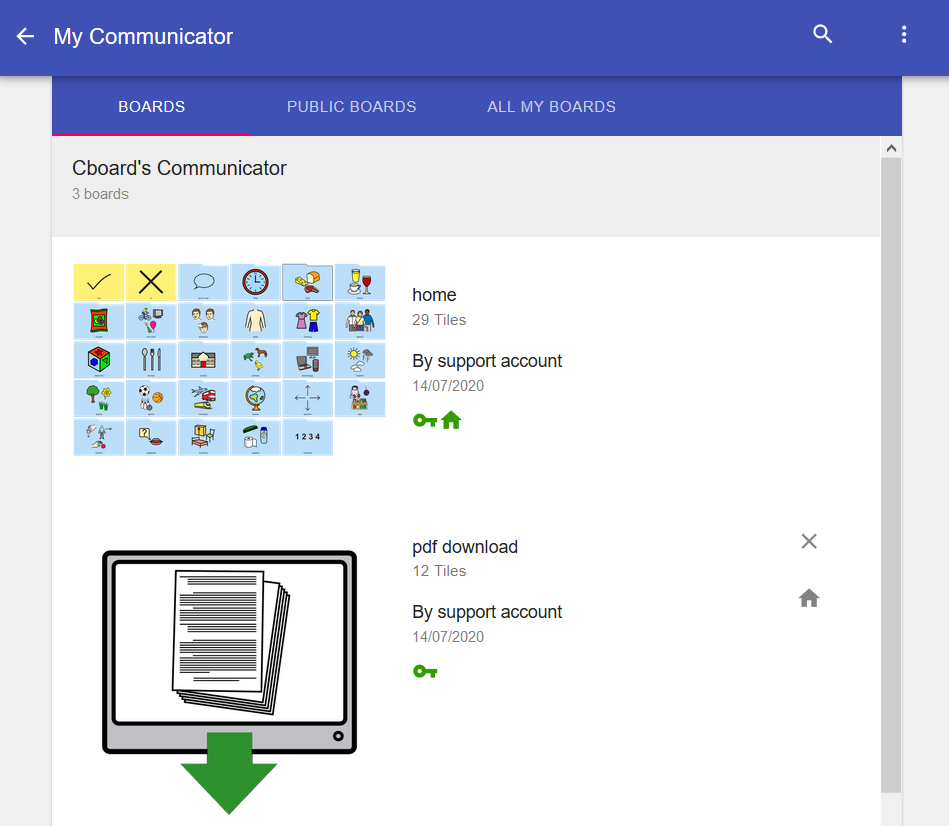
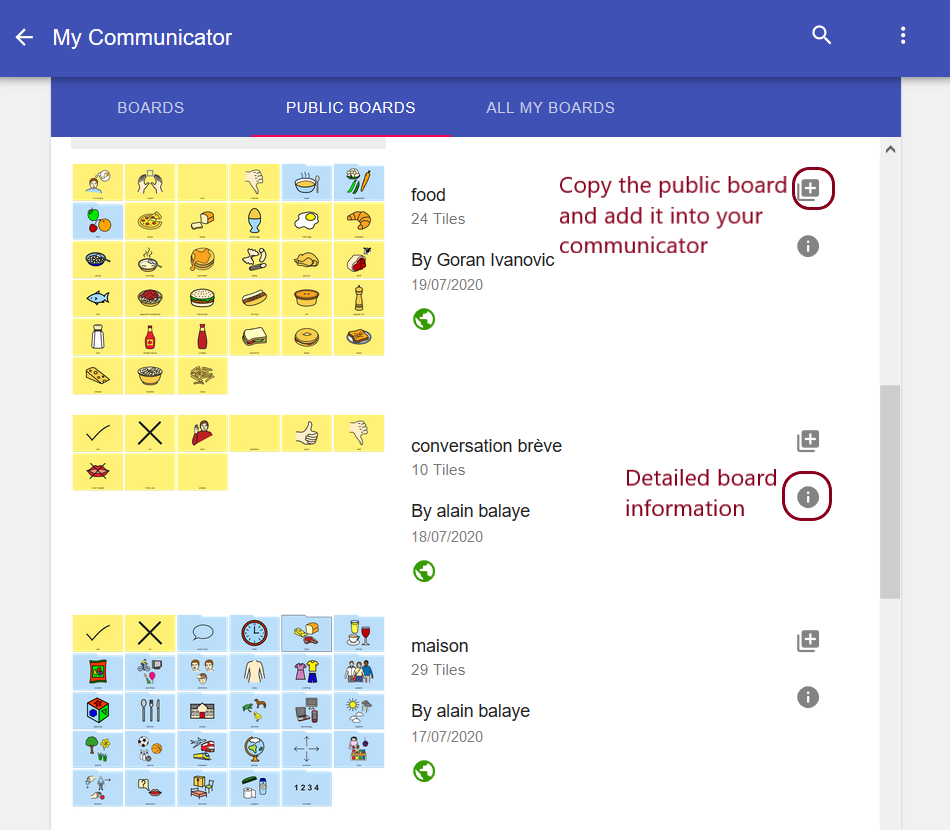
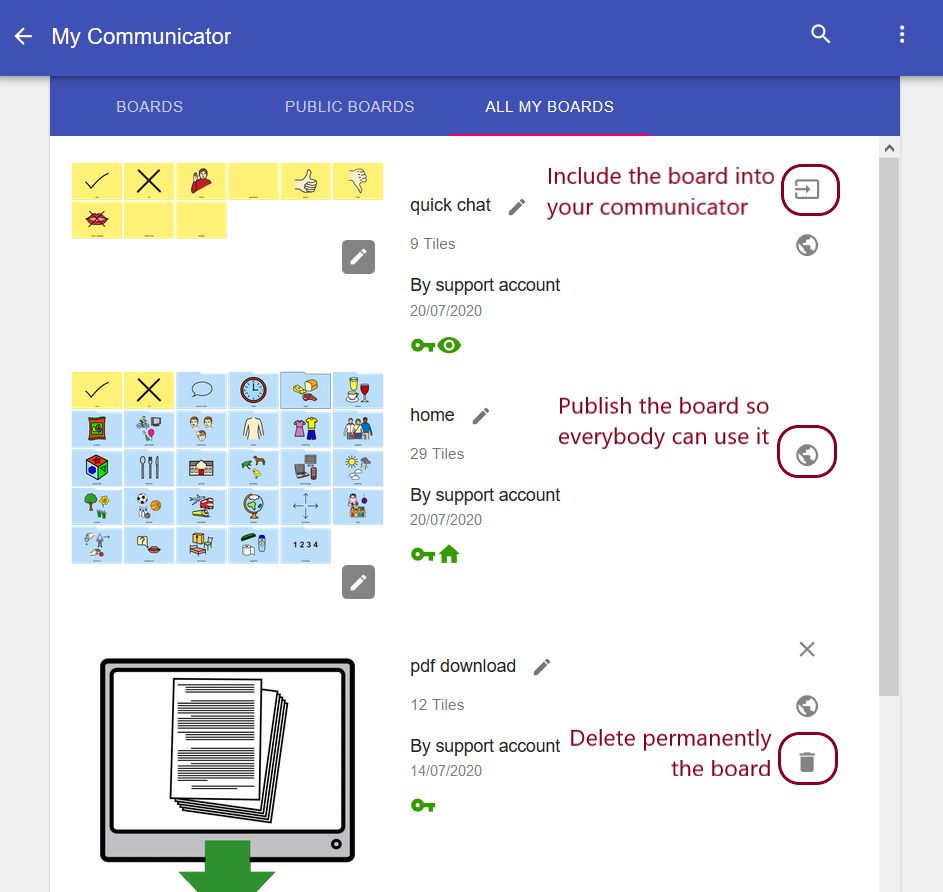
The communicator builder is a feature that allows you to handle boards in order to copy, delete, publish, add and remove them. In order to access to the functionality you need to unlock settings and click on 'Build' buttton. You will see a new page structured on three different tabs: boards, public boards, all my boards. See figure below:
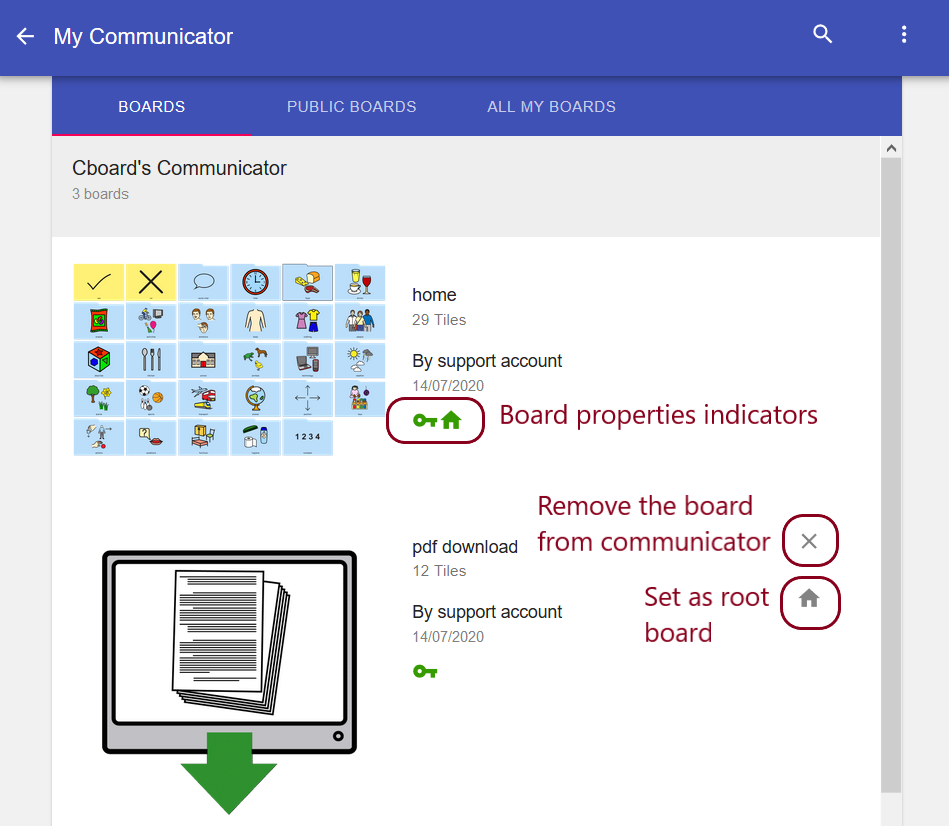
The default tab you will see in communicator builder is the communicator boards tab, that will display all boards included into your communicator. You can make changes in your communicator from following action buttons:
-
Remove board from communicator: this buttton will quit the board from communicator but WILL NOT delete the board from the database and it is still available under 'All my boards' tab.
-
Set board as root: this buttton will define the board as the first board to be displayed every time you login to Cboard.
- Copy board: this buttton will create a copy of the board and it will add it into your communicator. As this is a copy of the public board, you can edit this board as you want without affecting the original public board.
Please note that JUST registered users can access to this tab functionality.
-
Remove board from communicator: this buttton will quit the board from communicator but WILL NOT delete the board from the database and it is still available.
-
Add board to the communicator: this buttton will include the board to the communicator.
-
Publish board: This action will make public the board and it will be displayed under the public boards tab. Everybody can see your board.
-
Unpublish board: This action will make the board private and it won't be displayed under the public boards tab. Nobody can see your board.
-
Delete board: This action will delete the board and it cannot be recovered. The board will be removed from the database.

