-
-
Notifications
You must be signed in to change notification settings - Fork 0
Tutorial
This addon has a somewhat simple but important to follow workflow. if the initial steps aren't follow correctly it could throw errors or not work at all
- Navigate to the release page on this repository then download the latest release
- go to blender preferences > addons > click on install
- navigate to the directory where you downloaded the zip file, click > install Ad-on
- Click the checkbox next to the name to activate
To use this addon, navigate to the Shader Node Editor, open the properties panel and click on PBR Bake

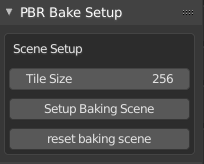
This section is dedicated to setting up the scene for optimal baking or resetting it to a more normal state
The tile size property represents the tile size in the scene render tab > performance. Larger values are better for emissive baking however I've found values above 256px are unstable
This button will
- Set the render samples to 1
- set the tile size to the tile size property
- turn off direct and indirect under the baking tab
This button will
- Set the render samples to 32
- Set the tile size to 16px
- reset direct and indirect under the baking tab

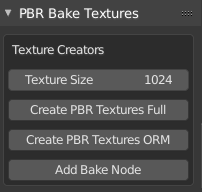
This section covers the creation of textures
This property sets the texture size for all the baking textures
This button will create a more full PBR Texture setup including
- Base Color
- Ambient Occlusion
- Specular
- Roughness
- Metalness
- Height
If one or more of these textures are un needed, simply select them and delete them.
This button will create a PBR texture layout that replaces the Ambient Occlusion, Roughness and Metalness textures with one texture that combines the three
This button creates a Node Group called "PBR Bake" This node has inputs and outputs for

- Base color
- Ambient Occlusion
- Specular
- Roughness
- Sheen
- Sheen Tint
- Clearcoat
- Clearcoat roughness
- Emission
- Alpha
- Transmission
- Transmission roughness
- Normal
- ORM
This node is important because it's used to automatically connect the inputs to an emission node then connect it to the material output When using this node it's important to connect/copy all of your Principled inputs to the the corresponding inputs of this node
The Normal map input requires a Normal Map or Bump Map node attached to it
Essentially, any node that you would attach to the Principled Node is applicable to this node as well.
Important: Where this button adds the PBR_Bake node to the project as a group, the baking process will not work if you add the node to the material via the Add Node > Group Dialog, unless you change the name of the group in the properties panel to "PBR_Bake". The Add Bake Node button does this automatically.

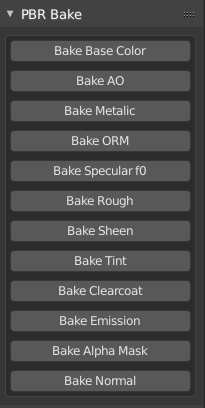
Once you have completed the steps above, it's time to bake some textures.
- To Bake, select the texture node you wish to bake, ie. base color and then click the button corresponding to the texture you wish to bake, ie Bake Base color
- When that completes continue to the next node and repeat the previous step with each remaining node
- make sure to save each texture when you've baked them

That's it. It might not be as nice as a one button solution but to me it feels much better than the old slow method that we've been using.
Have fun baking!