Clarkson is a web-based dashboard application that gives you a neat and clean interface for logging your fuel fill-ups for all of your vehicles. The application has full multi-user support, as well as multiple vehicles per user. Whenever you fill-up your car or motorcycle, keep the receipt and record the data in Clarkson.
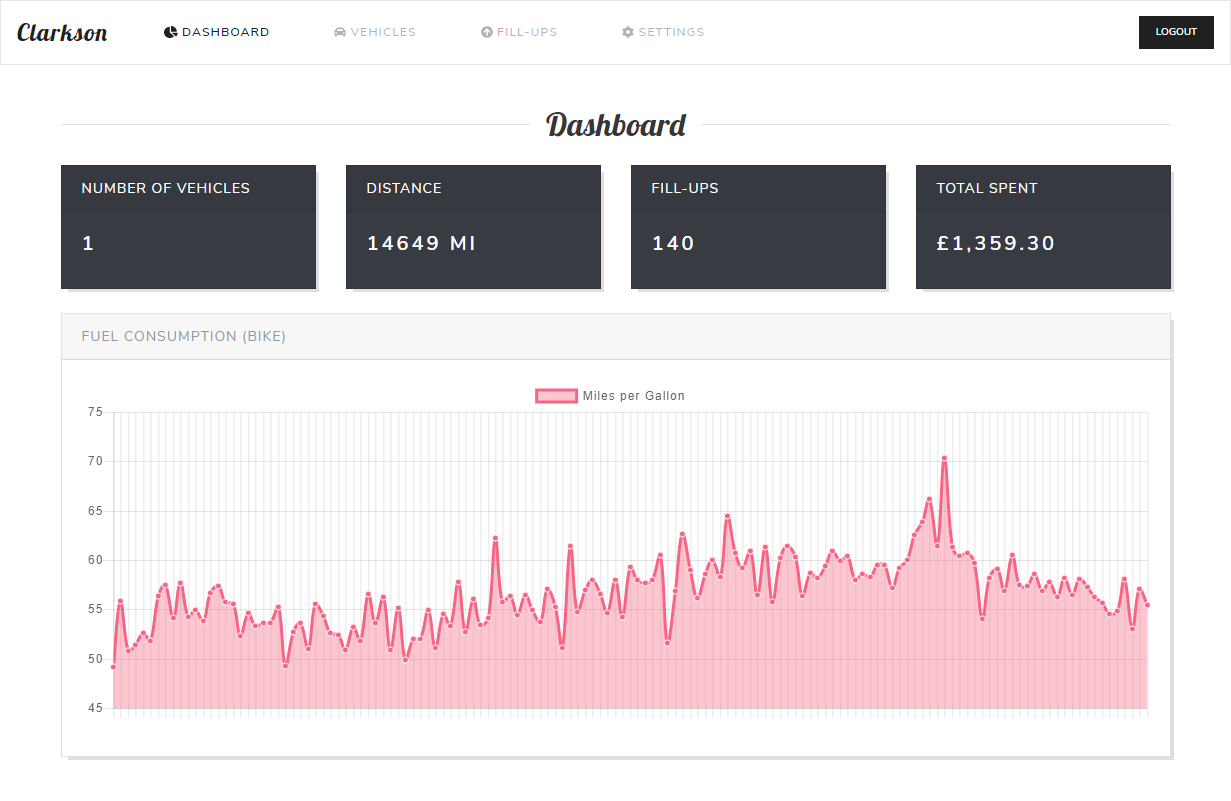
- Dashboard giving you high-level statistics on your vehicle fill-ups, including:
- Total spent on fill-ups on all your vehicles
- Total distance traveled
- Graphs showing fuel consumption trends
- Add/edit/remove an unlimited number of vehicles
- Include basic information such as Make, Model, Registration, VIN, Fuel Type
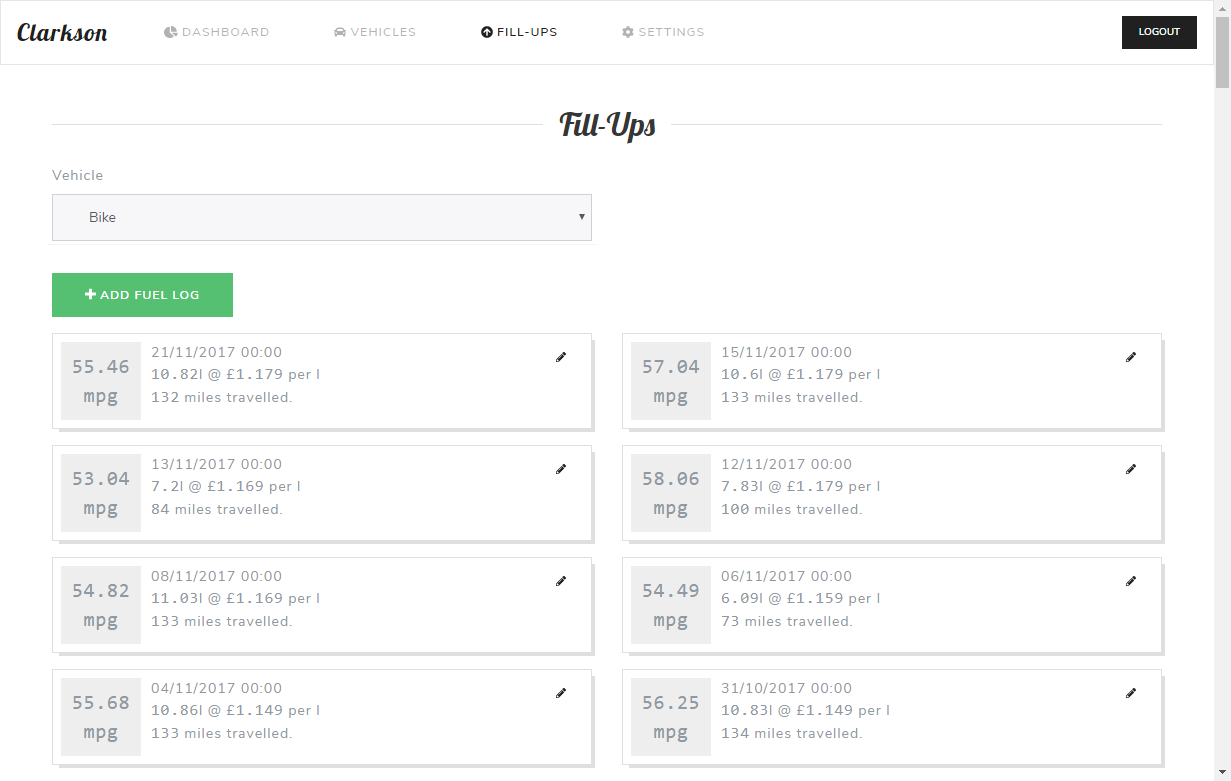
- Add/edit/remove fuel fill-ups
- Total cost or unit cost will be automatically calculated as you enter the data
- Include any notes
- Inform the app whether or not the fill-up was to the top (full tank), or if you missed any previous fill-ups
- Choose your units - available settings:
- Fuel Units: Litres, Gallons, or US Gallons
- Consumption Units: MPG, L/100KM
- Distance Units: Miles, Kilometres
- Currency Units: GBP, USD, EUR, AUD, CAD
Clarkson has an Angular front-end, with ExpressJS backend, connecting to a MySQL database. It uses Flyway as a means of managing incremental migrations of the database schema.
To get the application running, you'll need node and npm installed. Firstly, install the angular-cli (plus ts dependencies):
npm install -g @angular/cli ts-node typescriptThen grab all of the dependencies for the app itself:
npm installDepending on how you run the application, you'll need to update the src/environments/environment.prod.ts file so the frontend points to the right server URL:
export const environment = {
    production: true,
    apiBaseUrl: 'https://your-domain-here/api' // or use 'http://<local_network_ip>:3000' if not behind a reverse proxy
};Once you're happy with the endpoint in config, build the frontend:
ng build --prodThis will create a dist/ directory, which is where the frontend gets served.
Before you run the application, you'll need to run a database migration using flyway. This will create the schema and initial tables/procedures that are used by Clarkson. To do this, run:
./flyway/flyway -user=<mysql_user> -password=<mysql_user> -schemas=clarkson -url=jdbc:mysql://<mysql_host_ip> migrateNote: The -user, -password and -url values must match those that you use when running the application (see below).
JRE: Flyway is a Java tool, so requires the JRE to be available in $PATH. It is not packaged as part of this application due to variations in OS requirements.
Finally, start the application by running:
MYSQL_HOST=<mysql_host_ip> MYSQL_USERNAME=<mysql_user> MYSQL_PASSWORD=<mysql_user> ENABLE_REGISTRATIONS=true APP_PORT=3000 node clarkson.jsEnvironment variables at startup:
| Env | Required? | Used for |
|---|---|---|
| MYSQL_HOST | Yes | Points the backend to the MySQL database |
| MYSQL_USERNAME | Yes | The user with access to the clarkson schema |
| MYSQL_PASSWORD | Yes | The password for the user |
| ENABLE_REGISTRATIONS | No | Defaults to false. If set to true, allows new users to register |
| APP_PORT | No | Defaults to 3000. Changes the running port of the application |
Passenger is an application server which is able to run nodejs applications. It is able to start your nodejs application if needed (ie if an http request for clarkson app arrives). It is also able to stop it when it's not used anymore.
This section describes the deployment procedure for clarkson to integrate with apache2 + passenger. Clarkson is one of several virtual hosts in apache config. This config is used on a raspberry.
Login to your machine which acts as the http server. You do not need to login as root. It is assumed that apache2 + passenger are already installed.
- git clone your code
cd /opt
git clone https://github.com/Max-Z80/Clarkson.git The idea is -1- to create a specific user for the clarkson app, -2- create the database and -3- create the tables inside.
 mysql -u root -h localhost -p
> CREATE USER '--yourMySQLUser--'@'localhost' IDENTIFIED BY '--yourMySQLUserPassword--';
> create database clarkson;
> grant ALL PRIVILEGES on clarkson.* TO 'clarkson'@'localhost';
> flush privileges;
Populate the database following the section above Migrate the database
The following configuration gives access to the app via http://yourdomainOrIP/clarkson.
<VirtualHost *:80>
  # if you access your server via an IP address the following line is commented
 	ServerName --yourDomain--

	ServerAdmin webmaster@localhost
	DocumentRoot /var/www/html

	LogLevel debug

	ErrorLog ${APACHE_LOG_DIR}/error.log
	CustomLog ${APACHE_LOG_DIR}/access.log combined

# These have been added:
    Alias "/clarkson" "/opt/Clarkson/dist"
    <Location /clarkson>
        PassengerUser --userUsedToInstallTheCode--
        PassengerGroup --userGroupUsedToInstallTheCode--
        SetEnv MYSQL_HOST --domainWhereYouDBIsLocatedForExampleLocalhost--
        SetEnv MYSQL_USERNAME --yourMySQLUser--
        SetEnv MYSQL_PASSWORD --yourMySQLUserPassword--
        SetEnv ENABLE_REGISTRATIONS --trueOrFalse--

        SetEnv PassengerBaseURI /clarkson
        PassengerAppRoot /opt/Clarkson

        PassengerAppType node
        PassengerStartupFile clarkson.js
        PassengerNodejs --pathToNodejs--
    </Location>
    <Directory /opt/Clarkson/dist>
        Allow from all
        Options -MultiViews
        # Uncomment this if you're on Apache >= 2.4:
        Require all granted
    </Directory>
</VirtualHost>
Notes:
- You see that the enviroment variables which are required to start clarkson in the standalone mode are provided here. Note that the port env var is not provided. You may ask why ? Well passenger will interact with clarkson app via an unix socket which short circuit the tcp connexion. more here So there is no tcp connexion between clarkson and passenger so the port parameter is useless. This is one of passengers features.
- The environment variable called PassengerBaseURI is transmitted to the app too. It is used by the server to adapt to the production environment. Indeed, when this value is provided, the express server of Clarkson adds '/clarkson' in front on all the API calls. As far as I understood, passenger itself is not able to remove this string from the incoming requests before they are served to the clarkson app. related issue.
Don't forget to restart apache
sudo /etc/init.d/apache2 restartedit /src/enviroment/environment.prod.ts
export const environment = {
    production: true,
    apiBaseUrl: 'http://--YOUR_IP_orDOMAIN--/clarkson' + '/api',
    enableRegistrations: true
};To get the application running, you'll need node and npm installed. Firstly, install the angular-cli (plus ts dependencies):
npm install -g @angular/cli ts-node typescriptThen grab all of the dependencies for the app itself:
npm installThe key point here is to change the html element value in your /dist/index.html such that images , css files and js files are properly rooted by apache/passenger to the proper folder.
ng build --prod --base-href /clarkson/This will create a dist/ directory, which is where the frontend gets served.
You should be able to access Clarkson with you browser pointing to: http://---yourIPOrDomain--/clarkson
It could be that the app does not work. There are several passenger debugging commands.
passenger-statusThis must work. It was not by default in my case. I add to add the following line in /etc/apache2/apache.conf.
PassengerInstanceRegistryDir --pathToADirectory--pathToADirectory is a directory that I have created. Passenger will store important stuff in this folder. Its existance is mandatory.
Then you can also run passenger status as follows:
export PASSENGER_INSTANCE_REGISTRY_DIR=--pathToADirectory--
passenger-status
You can also login to mysql CLI and check that clarkson user is connected to the db with:
> show processlist; - Web Framework: Angular
- Server: ExpressJS
- Security: Helmet
- Charts: ChartJS
- Charts: ng2-charts
- Theme: Bootstrap
- Theme: Bootswatch
- Flash Notifications: angular2-flash-messages