


Auth0 is an authentication broker that supports social identity providers as well as enterprise identity providers such as Active Directory, LDAP, Google Apps and Salesforce.
Lock makes it easy to integrate SSO in your app. You won't have to worry about:
- Having a professional looking login dialog that displays well on any device.
- Finding the right icons for popular social providers.
- Solving the home realm discovery challenge with enterprise users (i.e.: asking the enterprise user the email, and redirecting to the right enterprise identity provider).
- Implementing a standard sign in protocol (OpenID Connect / OAuth2 Login)
- Integrates your iOS app with Auth0 (OS X coming soon).
- Provides a beautiful native UI to log your users in.
- Provides support for Social Providers (Facebook, Twitter, etc.), Enterprise Providers (AD, LDAP, etc.) and Username & Password.
- Provides the ability to do SSO with 2 or more mobile apps similar to Facebook and Messenger apps.
- 1Password integration using iOS 8 Extension.
- Passwordless authentication using TouchID and SMS.
iOS 7+. If you need to use our SDK in an earlier version please use our previous SDK pod Auth0Client or check the branch old-sdk of this repo.
The Lock is available through CocoaPods. To install it, simply add the following line to your Podfile:
pod "Lock", "~> 1.12"Then in your project's Info.plist file add the following entries:
- Auth0ClientId: The client ID of your application in Auth0.
- Auth0Domain: Your account's domain in Auth0.
You can find these values in your app's settings in Auth0 dashboard.
For example:

Also you need to register a Custom URL type, it must have a custom scheme with the following format a0<Your Client ID>. For example if your Client ID is Exe6ccNagokLH7mBmzFejP then the custom scheme should be a0Exe6ccNagokLH7mBmzFejP.
Before you start using Lock, we need to import Lock to your codebase, if you are still working in Objective-C you need to import this header when you need to use Lock's classes:
#import <Lock/Lock.h>The same applies if you are working in Swift and Lock is included as a static library but the header must be included in your Objective-C Bridging Header.
If you need help creating the Objective-C Bridging Header, please check the wiki
If you are working in Swift with Lock included as an framework, just include in your swift files the module like this:
import LockNow it's time to initialize A0Lock, which will help you handle the authentication for you, and keep it in your AppDelegate as a strong property. We will create it inside -application:didFinishLaunchingWithOptions:
You can store
A0Lockin another place if you prefer, as long as you keep it alive as long as you need it.
self.lock = [A0Lock newLock];self.lock = A0Lock()Then call this method
[self.lock applicationLaunchedWithOptions:launchOptions];self.lock.applicationLaunchedWithOptions(launchOptions)Finally you'll need to handle the already registered custom scheme in your AppDelegate, so override -application:openURL:sourceApplication:annotation: method and add the following line:
- (BOOL)application:(UIApplication *)application openURL:(NSURL *)url sourceApplication:(NSString *)sourceApplication annotation:(id)annotation {
    return [self.lock handleURL:url sourceApplication:sourceApplication];
}
func application(application: UIApplication, openURL url: NSURL, sourceApplication: String?, annotation: AnyObject?) -> Bool {
return self.lock.handleURL(url, sourceApplication: sourceApplication)
}This is required to be able to return back to your application when authenticating with Safari (or native integration with FB or Twitter if used). This call checks the URL and handles all that have the custom scheme defined before.
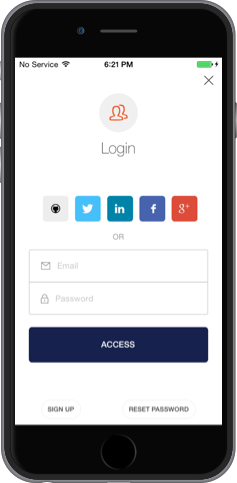
A0LockViewController will handle Email/Password, Enterprise & Social authentication based on your Application's connections enabled in your Auth0's Dashboard.
First instantiate A0LockViewController and register the authentication callback that will receive the authenticated user's credentials. Finally present it as a modal view controller:
A0Lock *lock = ... //Fetch Lock from where its stored
A0LockViewController *controller = [lock newLockViewController];
controller.onAuthenticationBlock = ^(A0UserProfile *profile, A0Token *token) {
    // Do something with token & profile. e.g.: save them.
    // Lock will not save the Token and the profile for you.
    // And dismiss the UIViewController.
    [self dismissViewControllerAnimated:YES completion:nil];
};
[self presentViewController:controller animated:YES completion:nil];
let lock = ... //Fetch Lock from where its stored
let controller = lock.newLockViewController()
controller.onAuthenticationBlock = {(profile: A0UserProfile!, token: A0Token!) -> () in
// Do something with token & profile. e.g.: save them.
// Lock will not save the Token and the profile for you.
// And dismiss the UIViewController.
self.dismissViewControllerAnimated(true, completion: nil)
}
self.presentViewController(controller, animated: true, completion: nil)And you'll see our native login screen
By default all social authentication will be done using Safari, if you want native integration please check this wiki page.
Also you can check our Swift and Objective-C example apps. For more information on how to use Lock with Swift please check this guide
A0TouchIDLockViewController authenticates without using a password with TouchID. In order to be able to authenticate the user, your application must have a Database connection enabled.
First instantiate A0TouchIDLockViewController and register the authentication callback that will receive the authenticated user's credentials. Finally present it to the user:
A0Lock *lock = ... //Fetch Lock from where its stored
A0TouchIDLockViewController *controller = [lock newTouchIDViewController];
controller.onAuthenticationBlock = ^(A0UserProfile *profile, A0Token *token) {
    // Do something with token & profile. e.g.: save them.
    // Lock will not save the Token and the profile for you.
    // And dismiss the UIViewController.
    [self dismissViewControllerAnimated:YES completion:nil];
};
[lock presentTouchIDController:controller fromController:self];
let lock = ... //Fetch Lock from where its stored
let controller = lock.newTouchIDViewController()
lock.onAuthenticationBlock = {(profile: A0UserProfile!, token: A0Token!) -> () in
// Do something with token & profile. e.g.: save them.
// Lock will not save the Token and the profile for you.
// And dismiss the UIViewController.
self.dismissViewControllerAnimated(true, completion: nil)
}
lock.presentTouchIDController(controller, fromController: self)And you'll see TouchID login screen

Because it uses a Database connection, the user can change it's password and authenticate using email/password whenever needed. For example when you change your device.
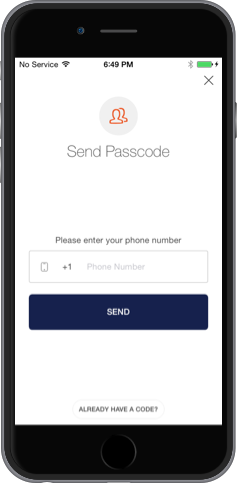
A0SMSLockViewController authenticates without using a password with SMS. In order to be able to authenticate the user, your application must have the SMS connection enabled and configured in your dashboard.
First instantiate A0SMSLockViewController and register the authentication callback that will receive the authenticated user's credentials.
Finally present it to the user:
A0Lock *lock = ... //Fetch Lock from where its stored
A0SMSLockViewController *controller = [lock newSMSViewController];
controller.onAuthenticationBlock = ^(A0UserProfile *profile, A0Token *token) {
    // Do something with token & profile. e.g.: save them.
    // Lock will not save the Token and the profile for you.
    // And dismiss the UIViewController.
    [self dismissViewControllerAnimated:YES completion:nil];
};
[lock presentSMSController:controller fromController:self];
let lock = ... //Fetch Lock from where its stored
let controller = lock.newSMSViewController()
lock.onAuthenticationBlock = {(profile: A0UserProfile!, token: A0Token!) -> () in
// Do something with token & profile. e.g.: save them.
// Lock will not save the Token and the profile for you.
// And dismiss the UIViewController.
self.dismissViewControllerAnimated(true, completion: nil)
}
lock.presentSMSController(controller, fromController: self)And you'll see SMS login screen
A very cool thing you can do with Lock is use SSO. Imagine you want to create 2 apps. However, you want that if the user is logged in in app A, he will be already logged in in app B as well. Something similar to what happens with Messenger and Facebook as well as Foursquare and Swarm.
Read this guide to learn how to accomplish this with this library.
##API
###A0Lock
####A0Lock#newLock
+ (instancetype)newLock;Creates a new A0Lock instance using account information from Info.plist file.
A0Lock *lock = [A0Lock newLock];####A0Lock#newLockWithClientId:domain:
+ (instancetype)newLockWithClientId:(NSString *)clientId domain:(NSString *)domain;Creates a new A0Lock instance with Auth0 clientId and domain.
A0Lock *lock = [A0Lock newLockWithClientId:@"YOUR_CLIENT_ID" domain:@"YOUR_DOMAIN"];####A0Lock#newLockWithClientId:domain:configurationDomain:
+ (instancetype)newLockWithClientId:(NSString *)clientId domain:(NSString *)domain configurationDomain:(NSString *)configurationDomain;Creates a new A0Lock instance with Auth0 clientId, domain and configurationDomain.
A0Lock *lock = [A0Lock newLockWithClientId:@"YOUR_CLIENT_ID" domain:@"YOUR_DOMAIN" configurationDomain:@"YOUR_CONFIG_DOMAIN"];####A0Lock#apiClient
- (A0APIClient *)apiClient;Returns an instance of the API client for Authentication API configured for your application.
A0APIClient *client = [lock apiClient];####A0Lock#newUserAPIClientWithIdToken
- (A0UserAPIClient *)newUserAPIClientWithIdToken:(NSString *)idToken;Returns a new instance of the API client for Auth0 API with the credentials of a authenticated user obtained from the id_token
A0UserAPIClient *client = [lock newUserAPIClientWithIdToken:@"AN ID TOKEN"];####A0Lock#handleURL:sourceApplication:
- (BOOL)handleURL:(NSURL *)url sourceApplication:(NSString *)sourceApplication;Handle URL received from AppDelegate when application is called from a third party at the end of an authentication flow.
[lock handleURL:URL sourceApplication:sourceApplication];####A0Lock#registerAuthenticators
- (void)registerAuthenticators:(NSArray *)authenticators;Register IdP authenticators that will be used for Social & Enterprise connections. By default all Social & Enterprise authentications are performed by using the web flow with Safari but you can plug your own authenticator for a connection. e.g.: you can register A0FacebookAuthenticator in order to login with FB native SDK.
[lock registerAuthenticators:@[facebook, twitter]];####A0Lock#applicationLaunchedWithOptions
- (void)applicationLaunchedWithOptions:(NSDictionary *)launchOptions;Handle application launched event.
[lock applicationLaunchedWithOptions:launchOptions];####A0Lock#clearSessions
- (void)clearSessions;Remove all stored sessions of any IdP in your application. If the user logged in using Safari, those sessions will not be cleaned.
[lock clearSessions];###A0LockViewController
####A0LockViewController#init
- (instancetype)initWithLock:(A0Lock *)lock;Initialise 'A0LockViewController' using a A0Lock instance.
A0LockViewController *controller = [[A0LockViewController alloc] initWithLock:lock];####A0LockViewController#onAuthenticationBlock
@property (copy, nonatomic) void(^onAuthenticationBlock)(A0UserProfile *profile, A0Token *token);Block that is called on successful authentication. It has two parameters profile and token, which will be non-nil unless login is disabled after signup.
controller.onAuthenticationBlock = ^(A0UserProfile *profile, A0Token *token) {
  NSLog(@"Auth successful: profile %@, token %@", profile, token);
};
####A0LockViewController#onUserDismissBlock
@property (copy, nonatomic) void(^onUserDismissBlock)();Block that is called on when the user dismisses the Login screen. Only when closable property is YES.
controller.onUserDismissBlock = ^() {
  NSLog(@"User dismissed login screen.");
};
####A0LockViewController#usesEmail
@property (assign, nonatomic) BOOL usesEmail;Enable the username to be treated as an email (and validated as one too) in all Auth0 screens. Default is YES
controller.usesEmail = NO;####A0LockViewController#closable
@property (assign, nonatomic) BOOL closable;Allows the A0LockViewController to be dismissed by adding a button. Default is NO
controller.closable = YES;####A0LockViewController#loginAfterSignup
@property (assign, nonatomic) BOOL loginAfterSignUp;After a successful Signup, A0LockViewController will attempt to login the user if this property is YES otherwise will call onAuthenticationBlock with both parameters nil. Default value is YES
controller.loginAfterSignup = NO;####A0LockViewController#authenticationParameters
@property (assign, nonatomic) A0AuthParameters *authenticationParameters;List of optional parameters that will be used for every authentication request with Auth0 API. By default it only has 'openid' and 'offline_access' scope values. For more information check out our Wiki
controller.authenticationParameters.scopes = @[A0ScopeOfflineAccess, A0ScopeProfile];###A0LockViewController#signupDisclaimerView
@property (strong, nonatomic) UIView *signUpDisclaimerView;View that will appear in the bottom of Signup screen. It should be used to show Terms & Conditions of your app.
UIView *view = //..
controller.signupDisclaimerView = view;
####A0LockViewController#useWebView
@property (assign, nonatomic) BOOL useWebView;When the authentication requires to open a web login, for example Linkedin, it will use an embedded UIWebView instead of Safari if it's YES. Default values is YES. Due to recent rejection when submitting apps that login using Safari, we recommend to always use WebView
controller.useWebView = YESFor more information please check Lock's documentation in CocoaDocs.
If you have found a bug or if you have a feature request, please report them at this repository issues section. Please do not report security vulnerabilities on the public GitHub issue tracker. The Responsible Disclosure Program details the procedure for disclosing security issues.
Auth0 helps you to:
- Add authentication with multiple authentication sources, either social like Google, Facebook, Microsoft Account, LinkedIn, GitHub, Twitter, Box, Salesforce, amont others, or enterprise identity systems like Windows Azure AD, Google Apps, Active Directory, ADFS or any SAML Identity Provider.
- Add authentication through more traditional username/password databases.
- Add support for linking different user accounts with the same user.
- Support for generating signed Json Web Tokens to call your APIs and flow the user identity securely.
- Analytics of how, when and where users are logging in.
- Pull data from other sources and add it to the user profile, through JavaScript rules.
- Go to Auth0 and click Sign Up.
- Use Google, GitHub or Microsoft Account to login.
Auth0
Lock is available under the MIT license. See the LICENSE file for more info.