随着敏捷开发模式的日益流行,软件开发人员也越来越认识到日常编程过程中单元测试的重要性。 Maven 的重要职责之一就是自动运行单元测试,它通过maven-surefire-plugin与主流的单元测试框架JUnit3、JUnit4以及TestNG继承,并且能够自动生成丰富的结果报告。
本章将介绍 Maven 关于测试的一些重要特性,但不会深入解释单元测试框架本身及相关技巧,重点是介绍如何通过 Maven 控制单元测试的运行。
本章将引入其第三个模块:account-captcha。
在讨论maven-surefire-plugin之前,本章先介绍实现账户注册服务的account-captcha模块,该模块负责处理账户注册时验证码的key生成、图片生成以及验证等。
该模块的POM还是比较简单的:
<?xml version="1.0" encoding="UTF-8"?>
<project xmlns="http://maven.apache.org/POM/4.0.0"
         xmlns:xsi="http://www.w3.org/2001/XMLSchema-instance"
         xsi:schemaLocation="http://maven.apache.org/POM/4.0.0 http://maven.apache.org/xsd/maven-4.0.0.xsd">
    <parent>
        <artifactId>account-parent</artifactId>
        <groupId>com.juvenxu.mvnbook.account</groupId>
        <version>1.0.0-SNAPSHOT</version>
        <relativePath>../account-parent/pom.xml</relativePath>
    </parent>
    <modelVersion>4.0.0</modelVersion>

    <artifactId>account-captcha</artifactId>
    <name>Account Captcha</name>

    <properties>
        <kaptcha.version>2.3.2</kaptcha.version>
    </properties>

    <dependencies>
        <!--<dependency>-->
            <!--<groupId>com.google.code.kaptcha</groupId>-->
            <!--<artifactId>kaptcha</artifactId>-->
            <!--<version>${kaptcha.version}</version>-->
            <!--<classifier>jdk15</classifier>-->
        <!--</dependency>-->

        <!-- https://mvnrepository.com/artifact/com.github.penggle/kaptcha -->
        <dependency>
            <groupId>com.github.penggle</groupId>
            <artifactId>kaptcha</artifactId>
            <version>${kaptcha.version}</version>
        </dependency>
        <dependency>
            <groupId>org.springframework</groupId>
            <artifactId>spring-core</artifactId>
        </dependency>
        <dependency>
            <groupId>org.springframework</groupId>
            <artifactId>spring-beans</artifactId>
        </dependency>
        <dependency>
            <groupId>org.springframework</groupId>
            <artifactId>spring-context</artifactId>
        </dependency>
        <dependency>
            <groupId>junit</groupId>
            <artifactId>junit</artifactId>
        </dependency>
    </dependencies>

    <!--<repositories>-->
        <!--<repository>-->
            <!--<id>sonatype-forge</id>-->
            <!--<name>Sonatype Forge</name>-->
            <!--<url>http://repository.sonatype.com/content/groups/forge/</url>-->
            <!--<releases>-->
                <!--<enabled>true</enabled>-->
            <!--</releases>-->
            <!--<snapshots>-->
                <!--<enabled>false</enabled>-->
            <!--</snapshots>-->
        <!--</repository>-->
    <!--</repositories>-->

</project>
首先POM中第一部分是父模块声明。 紧接着是该项目本身的artifactId和名称,groupId和version没有声明,将自动继承父模块。 再往下声明了一个Maven属性kaptcha.version,该属性用在依赖声明中,account-captcha的依赖除了SpringFramework和JUnit之外,还有一个com.google.code.kaptcha:kaptcha。 Kaptcha是一个用来生成验证码(Captcha)的开源类库,account-captcha将用来生成注册账户时所需要的验证码图片,如果想要了解更多关于Kaptcha的信息,可以访问其项目主页:https://code.google.com/p/kaptcha/。
POM中 SpringFramework 和 JUnit 的依赖配置都继承自父模块,这里不再赘述。
POM的最后声明了 Sonatype Forge 这一公共仓库,这是因为Kaptcha并没有上传的中央仓库,我们可以从Sonatype Forge仓库获得该构件。如果有自己的私服,就不需要在POM中声明该仓库了,可以代理 Sonatype Forge仓库,或者直接将Kaptcha上传到自己的仓库中。
最后,不能忘记把account-captcha加入到聚合模块(也就是父模块)account-parent中:
....
    <modelVersion>4.0.0</modelVersion>
    <groupId>com.juvenxu.mvnbook.account</groupId>
    <artifactId>account-parent</artifactId>
    <packaging>pom</packaging>
    <name>Account Parent</name>
    <version>1.0.0-SNAPSHOT</version>
    <modules>
        <module>../account-email</module>
        <module>../account-persist</module>
        <module>../account-captcha</module>
    </modules>
....account-captcha需要提供的服务是生成随机的验证码主键,然后用户可以使用这个主键要求服务生成一个验证码图片,这个图片对应的纸应该是随机的,最后用户用肉眼读取图片的值,并将验证码的主键与这个值交给服务进行验证。 这一服务对应的接口可以定义:
package com.juvenxu.mvnbook.account.captcha;

public class AccountCaptchaException extends Exception {

    public AccountCaptchaException(String message) { super(message);}
    public AccountCaptchaException(String message, Throwable cause) {
        super(message, cause);
    }
}
package com.juvenxu.mvnbook.account.captcha;
import java.util.List;
public interface AccountCaptchaService {
String generateCaptchaKey() throws AccountCaptchaException;
byte[] generateCaptchaImage(String captchaKey) throws AccountCaptchaException;
boolean validateCaptcha(String captchaKey, String captchaValue) throws AccountCaptchaException;
List<String> getPreDefinedTexts();
void setPreDefinedTexts(List<String> preDefinedTexts);
}很显然,generateCaptchaKey()用来生成随机的验证码主键,generateCaptchaImage()用来生成验证码图片,而validateCaptcha()用来验证用户反馈的主键和值。
该接口定义了额外的getPreDefinedTexts()和setPreDefinedTexts()方法,通过这一组方法,用户可以预定义验证码图片的内容,同时也提高了可测试性。
如果
AccountCaptchaService永远生成随机是验证码图片,那么没有人工的参与就很难测试该功能。
现在,服务允许传入一个文本列表,这样就可以基于这些文本生成验证码,阿么我们也就能控制验证码图片的内容了。
为了能够生成随机的验证码主键,引入一个RandomGenerator类,如下:
package com.juvenxu.mvnbook.account.captcha;
import java.util.Random;

public class RandomGenerator {
    private static String range = "0123456789abcdefghijklmnopqrstuvwxyz";

    public static synchronized String getRandomString() {
        Random random = new Random();
        StringBuffer result = new StringBuffer();
        for (int i = 0; i < 8; i++) {
            result.append(range.charAt(random.nextInt(range.length())));
        }

        return result.toString();
    }
}RandomGenerator类提供了一个静态且线程安全的getRandomString()方法,该方法生成一个长度为8的字符串,每个字符都是随机地从所有数字和字母中挑选,这里主要是使用了java.util.Random类,其nextInt(int n)方法会返回一个大于等于0且小于n的证书。 代码中的字段range包含了所有的数字与字幕,将其长度传给nextInt()方法后就能获得一个随机的下表,再调用range.charAt()就可以随机取得一个其包含的字符了。
现在看AccountCaptchaService的实现类AccountCaptchaServiceImpl。首先需要初始化验证码图片生成器,代码如下:
package com.juvenxu.mvnbook.account.captcha;

import java.awt.image.BufferedImage;
import java.io.ByteArrayOutputStream;
import java.io.IOException;
import java.util.HashMap;
import java.util.List;
import java.util.Map;
import java.util.Properties;

import javax.imageio.ImageIO;

import org.springframework.beans.factory.InitializingBean;

import com.google.code.kaptcha.impl.DefaultKaptcha;
import com.google.code.kaptcha.util.Config;

public class AccountCaptchaServiceImpl implements AccountCaptchaService, InitializingBean
{
    private DefaultKaptcha producer;

    private Map<String, String> captchaMap = new HashMap<String, String>();

    private List<String> preDefinedTexts;

    private int textCount = 0;

    public void afterPropertiesSet()
            throws Exception
    {
        producer = new DefaultKaptcha();

        producer.setConfig( new Config( new Properties() ) );
    }

    public String generateCaptchaKey()
    {
        String key = RandomGenerator.getRandomString();

        String value = getCaptchaText();

        captchaMap.put( key, value );

        return key;
    }

    public List<String> getPreDefinedTexts()
    {
        return preDefinedTexts;
    }

    public void setPreDefinedTexts( List<String> preDefinedTexts )
    {
        this.preDefinedTexts = preDefinedTexts;
    }

    private String getCaptchaText()
    {
        if ( preDefinedTexts != null && !preDefinedTexts.isEmpty() )
        {
            String text = preDefinedTexts.get( textCount );

            textCount = ( textCount + 1 ) % preDefinedTexts.size();

            return text;
        }
        else
        {
            return producer.createText();
        }
    }

    public byte[] generateCaptchaImage( String captchaKey ) throws AccountCaptchaException
    {
        String text = captchaMap.get( captchaKey );

        if ( text == null )
        {
            throw new AccountCaptchaException( "Captch key '" + captchaKey + "' not found!" );
        }

        BufferedImage image = producer.createImage( text );

        ByteArrayOutputStream out = new ByteArrayOutputStream();

        try
        {
            ImageIO.write( image, "jpg", out );
        }
        catch ( IOException e )
        {
            throw new AccountCaptchaException( "Failed to write captcha stream!", e );
        }

        return out.toByteArray();
    }

    public boolean validateCaptcha( String captchaKey, String captchaValue )
            throws AccountCaptchaException
    {
        String text = captchaMap.get( captchaKey );

        if ( text == null )
        {
            throw new AccountCaptchaException( "Captch key '" + captchaKey + "' not found!" );
        }

        if ( text.equals( captchaValue ) )
        {
            captchaMap.remove( captchaKey );

            return true;
        }
        else
        {
            return false;
        }
    }
}我们首先关注afterPropertySet()方法。
AccountCaptchaServiceImpl实现了SpringFramework的InitializingBean接口,该接口定义了一个方法afterPropertiesSet(),该方法会被SpringFramework初始化对象的时候调用。 该代码中使用该方法初始化验证码生成器producer,并且为producer提供了默认的配置。
接着 AccountCaptchaServiceImpl需要实现generateCaptchaKey()方法,如下:
    private Map<String, String> captchaMap = new HashMap<String, String>();

    private List<String> preDefinedTexts;

    private int textCount = 0;

    public String generateCaptchaKey()
    {
        String key = RandomGenerator.getRandomString();

        String value = getCaptchaText();

        captchaMap.put( key, value );

        return key;
    }

    public List<String> getPreDefinedTexts()
    {
        return preDefinedTexts;
    }

    public void setPreDefinedTexts( List<String> preDefinedTexts )
    {
        this.preDefinedTexts = preDefinedTexts;
    }

    private String getCaptchaText()
    {
        if ( preDefinedTexts != null && !preDefinedTexts.isEmpty() )
        {
            String text = preDefinedTexts.get( textCount );

            textCount = ( textCount + 1 ) % preDefinedTexts.size();

            return text;
        }
        else
        {
            return producer.createText();
        }
}上述代码中的generateCaptchaKey()首先生成一个随机的验证码主键,每个主键将和一个验证码字符串相关联,然后这组关联会被存储到captchaMap中以备将来验证。 主键的目的仅仅是标识验证码图片,其本身没有实际的意义。 代码中的getChaptchaText()用来生成验证码字符串,当preDefinedTexts不存在或者不为空的时候,就顺序的循环该字符串列表读取值。preDefinedTexts有其对应的一组get和set方法,这样就能让用户预定义验证码字符串的值。
有了验证码图片的主键,AccountCaptchaServiceImpl就需要实现generateCaptchaImage()方法来生成验证码图片。
public byte[] generateCaptchaImage( String captchaKey ) throws AccountCaptchaException
    {
    String text = captchaMap.get( captchaKey );

    if ( text == null )
    {
        throw new AccountCaptchaException( "Captch key '" + captchaKey + "' not found!" );
    }

    BufferedImage image = producer.createImage( text );

    ByteArrayOutputStream out = new ByteArrayOutputStream();

    try
    {
        ImageIO.write( image, "jpg", out );
    }
    catch ( IOException e )
    {
        throw new AccountCaptchaException( "Failed to write captcha stream!", e );
    }

    return out.toByteArray();
}为了生成验证码图片,就必须先得到验证码字符串的值,代码中通过使用主键来查询captchaMap获得该值,如果值不存在,就抛出异常。 有了验证码字符串的值之后,generateCaptchaImage()方法就能通过producer来生成一个BufferedImage,随后的代码将这个图片对象转换成jpg格式的字节数组并返回。 有了该字节数组,用户就能随意地将其保存成文件,或者在网页上显示。
最后是简单的验证过程:
    public boolean validateCaptcha( String captchaKey, String captchaValue )
            throws AccountCaptchaException
    {
        String text = captchaMap.get( captchaKey );

        if ( text == null )
        {
            throw new AccountCaptchaException( "Captch key '" + captchaKey + "' not found!" );
        }

        if ( text.equals( captchaValue ) )
        {
            captchaMap.remove( captchaKey );

            return true;
        }
        else
        {
            return false;
        }
}用户得到了验证码图片以及主键后,就会识别图片中所包含的字符串信息,然后将此验证码的值与主键一起反馈给validateCaptcha()方法以进行验证。 validateCaptcha()通过主键找到正确的验证码值,然后与用户提供的值进行比对,如果成功,则返回true。
当然,还需要一个SpringFramework的配置文件,它在资源目录src/main/resources/下,名为account-captcha.xml,如下:
<?xml version="1.0" encoding="UTF-8"?>
<beans xmlns="http://www.springframework.org/schema/beans"
       xmlns:xsi="http://www.w3.org/2001/XMLSchema-instance"
       xsi:schemaLocation="http://www.springframework.org/schema/beans
http://www.springframework.org/schema/beans/spring-beans-2.5.xsd">

    <bean id="accountCaptchaService"
          class="com.juvenxu.mvnbook.account.captcha.AccountCaptchaServiceImpl">
    </bean>
</beans>这是一个最简单的SpringFramework配置,它定义了一个id为accountCaptchaService的bean,其实现为刚才讨论的AccountCaptchaServiceImpl。
测试代码位于src/test/java/目录,其包名也与主代码一致,为com.juvenxu.mvnbook.account.captcha。
首先看一下简单的RandomGeneratorTest,代码如下:
package com.juvenxu.mvnbook.account.captcha;

import org.junit.Test;

import java.util.HashSet;
import java.util.Set;

import static org.junit.Assert.*;

public class RandomGeneratorTest {

    @Test
    public void getRandomString() {
        Set<String> randoms = new HashSet<String>();
        for (int i = 0; i < 100; i++) {
            String random = RandomGenerator.getRandomString();
            assertFalse(randoms.contains(random));
            randoms.add(random);
        }
    }
}该测试用例创建一个初识容量为100的集合randoms,然后循环100次用RandomGenerator生成随机字符串并放入randoms中,同时每次循环都检查新生成的随机值是否已经包含在集合中。 这样一个简单的检查能基本确定RandomGenerator生成值是否为随机的。
当然这个模块最重要的测试应该在AccountCaptchaService上,如下:
package com.juvenxu.mvnbook.account.captcha;

import org.junit.Before;
import org.junit.Test;
import org.springframework.context.ApplicationContext;
import org.springframework.context.support.ClassPathXmlApplicationContext;

import java.io.File;
import java.io.FileOutputStream;
import java.io.OutputStream;
import java.util.ArrayList;
import java.util.List;

import static org.junit.Assert.*;

public class AccountCaptchaServiceTest {

    private AccountCaptchaService service;

    @Before
    public void prepare() throws Exception {
        ApplicationContext ctx = new ClassPathXmlApplicationContext("account-captcha.xml");
        service = (AccountCaptchaService) ctx.getBean("accountCaptchaService");
    }

    @Test
    public void testGenerateCaptcha() throws Exception {
        String captchaKey = service.generateCaptchaKey();
        assertNotNull(captchaKey);

        byte[] captchaImage = service.generateCaptchaImage(captchaKey);
        assertTrue(captchaImage.length > 0);

        File image = new File("target/" + captchaKey + ".jpg");
        OutputStream output = null;
        try {
            output = new FileOutputStream(image);
            output.write(captchaImage);
        } finally {
            if (output != null) {
                output.close();
            }
        }
        assertTrue(image.exists() && image.length() > 0);
    }

    @Test
    public void testValidateCaptchaCorrect() throws Exception {
        List<String> preDefinedTexts = new ArrayList<String>();
        preDefinedTexts.add("12345");
        preDefinedTexts.add("abcde");
        service.setPreDefinedTexts(preDefinedTexts);

        String captchaKey = service.generateCaptchaKey();
        service.generateCaptchaImage(captchaKey);
        assertTrue(service.validateCaptcha(captchaKey, "12345"));

        captchaKey = service.generateCaptchaKey();
        service.generateCaptchaImage(captchaKey);
        assertTrue(service.validateCaptcha(captchaKey, "abcde"));
    }

    @Test
    public void testValidateCaptchaIncorrect() throws Exception {
        List<String> preDefinedTexts = new ArrayList<String>();
        preDefinedTexts.add("12345");
        service.setPreDefinedTexts(preDefinedTexts);

        String captchaKey = service.generateCaptchaKey();
        service.generateCaptchaImage(captchaKey);
        assertFalse(service.validateCaptcha(captchaKey, "67890"));
    }

}该测试类的prepare()方法使用@Before标注,在运行每个测试方法之前初始化AccountCaptchaService这个bean。
testGeneratorCaptcha()用来测试验证码图片的生成。 首先它获取一个验证码主键并检查其非空,然后使用该主键获得验证码图片,实际上是一个字节数组,并检查该字节数组的内容非空。 紧接着测试方法在项目的target目录下创建一个名为验证码主键的jpg格式文件,并将AccountCaptchaService返回的验证码图片字节数组内容写入到该jpg文件中,然后再检查文件存在且包含实际内容。 运行该测试之后,就能在项目的target目录下找到一个名为dhb022fc.jpg的文件,打开是一个验证码图片:

testValidateCaptchaCorrect()用来测试一个正确的Captcha验证流程。 它首先预定义了两个Captcha的值放到服务器中,然后依次生成验证码主键、验证码图片,并且使用主键和一直的值进行验证,确保服务正常工作。
最后的testValidateCaptchaIncorrect()方法测试当用户反馈的Captcha值错误时发生的情景,它预定义Captcha的值为"12345",但最后验证是传入了"67890",并检查validateCaptcha()方法返回的值为false。
现在运行测试,在项目account-parent目录下运行mvn test,就会得到如下输出:
[INFO] Scanning for projects...
[INFO]
[INFO] ------------< com.juvenxu.mvnbook.account:account-captcha >-------------
[INFO] Building Account Captcha 1.0.0-SNAPSHOT
[INFO] --------------------------------[ jar ]---------------------------------
[INFO]
[INFO] --- maven-resources-plugin:2.6:resources (default-resources) @ account-captcha ---
[INFO] Using 'UTF-8' encoding to copy filtered resources.
[INFO] Copying 1 resource
[INFO] 阿里云Maven中央仓库为阿里云云效提供的公共代理仓库,云效也提供了免费、可靠的Maven私有仓库Packages,欢迎您体验使用。https://www.aliyun.com/product/yunxiao/packages?channel=pd_maven_download
[INFO]
[INFO] --- maven-compiler-plugin:3.1:compile (default-compile) @ account-captcha ---
[INFO] Nothing to compile - all classes are up to date
[INFO]
[INFO] --- maven-resources-plugin:2.6:testResources (default-testResources) @ account-captcha ---
[INFO] Using 'UTF-8' encoding to copy filtered resources.
[INFO]
[INFO] --- maven-compiler-plugin:3.1:testCompile (default-testCompile) @ account-captcha ---
[INFO] Nothing to compile - all classes are up to date
[INFO]
[INFO] --- maven-surefire-plugin:2.12.4:test (default-test) @ account-captcha ---
..........

-------------------------------------------------------
 T E S T S
-------------------------------------------------------
Running com.juvenxu.mvnbook.account.captcha.AccountCaptchaServiceTest
........

Results :

Tests run: 4, Failures: 0, Errors: 0, Skipped: 0

[INFO] ------------------------------------------------------------------------
[INFO] BUILD SUCCESS
[INFO] ------------------------------------------------------------------------
[INFO] Total time:  7.602 s
[INFO] Finished at: 2021-09-26T23:12:45+08:00
[INFO] ------------------------------------------------------------------------
这个简单的报告告诉我们,Maven运行了两个测试类,其中第一个测试类RandomGenertorTest包含1个测试,第二个测试类AccountCaptchaServiceTest包含3个测试,所有4个运行完毕后,没有任何失败和错误,也没有跳过任何测试。
报告中的Failures、Errors、Skipped信息来源于JUnit测试框架。
Failures(失败)表示要测试的结果与预期不一致,例如测试代码期望返回值为true,但实际为false;Errors(错误)表示测试代码或产品发生了未预期的错误,例如产品代码抛出了一个空指针错误,该错误又没有被测试代码捕捉到;Skipped表示那些被标记为忽略的测试方法,在JUnit中用户可以使用@Ignore注解标记忽略测试方法。
Maven本身并不是一个单元测试框架,Java世界中主流的单元测试框架为JUnit和TestNG。 Maven 所做的只是在构建执行到特定生命周期阶段的时候,通过插件来执行JUnit或者TestNG的测试用例。 这一插件就是maven-surefire-plugin,可以称之为测试运行期(Test Runner),他能很好的兼容 JUnit3、JUnit4以及 TestNG。
回顾一下之前章节介绍的default生命周期,其中的test阶段被定义为“使用单元测试框架运行测试”。 我们知道,生命周期阶段需要绑定到某个插件的目标才能完成真正的工作,test阶段正是与maven-surefire-plugin的test目标相绑定了,这是一个内置的绑定。
在默认情况下,maven-surefire-plugin的test目标会自动执行测试源码路径(默认为src/test/java/)下所有符合一组命名模式的测试类。 这组模式为:
-
**/Test*.java: 任何子目录下所有命名以Test开头的Java类。 -
**/*Test.java: 任何子目录下所有命名以Test结尾的Java类。 -
**/*TestCase.java: 任何子目录下所有命名以TestCase结尾的Java类。
只要将测试类按上述模式命名,Mavan就能自动运行它们,用户也就不需要再定义测试集合(TestSuite)来聚合测试用例(TestCase)。 关于模式需要注意的是,以Tests结尾的测试类是不会得以自动执行的。
当然,如果有需要,可以自己定义要运行测试类的模式,这一点将在第五节详细描述。 此外,maven-surefire-plugin还支持更高级的TestNG测试集合xml文件,这一点将在第7节讲述。
当然,为了能够运行测试,Maven需要在项目中引入测试框架的依赖。
日常工作中,软件开发人员总有很多理由来跳过单元测试。 在大部分情况下,这些想法都是不对的,任何改动都要交给测试去验证,测试运行耗时过长应该考虑优化测试。
不管怎样,我们总会要求Maven跳过测试,这很简单,在命令行加入参数skipTests就可以了。
$ mvn package -DskipTests当然,也可以在 POM 中配置maven-surefire-plugin插件来提供该属性。 但这是不推荐的做法,如果配置 POM 让项目长时间跳过测试,则还要测试代码做什么呢?
<plugin>
	<groupId>org.apache.maven.plugins</groupId>
	<artifactId>maven-surefire-plugin</artifactId>
	<version>2.5</version>
	<configuration>
		<skipTests>true</skipTests>
	</configuration>
</plugin>有时候用户不仅想跳过测试运行,还想临时性跳过测试代码的编译,Maven也允许你这么做,但记住这是不推荐的:
$ mvn package -Dmaven.test.skip=true参数maven.test.skip同时控制了maven-compiler-plugin和maven-surefire-plugin两个插件的行为,测试代码编译跳过了,测试运行也跳过了。
对于命令行参数maven.test.skip的POM配置如下代码所示,但这种方法也是不推荐使用的:
<plugin>
	<groupId>org.apache.maven.plugins</groupId>
	<artifactId>maven-compiler-plugin</artifactId>
	<version>2.5</version>
	<configuration>
		<skip>true</skip>
	</configuration>
</plugin>
<plugin>
	<groupId>org.apache.maven.plugins</groupId>
	<artifactId>maven-surefire-plugin</artifactId>
	<version>2.5</version>
	<configuration>
		<skip>true</skip>
	</configuration>
</plugin>实际上maven-compiler-plugin的testCompiler目标和maven-surefire-plugin的test目标都提供了一个参数skip用来跳过测试编译和测试运行,而这个参数对应的命令行表达式为maven.test.skip。
反复运行单个测试用例是日常开发中很常见的行为。
maven-surefire-plugin提供了一个test参数让Maven用户能够在命令行指定要运行的测试用例。
例如,如果指向运行account-captcha的RandomGeneratorTest,就可以使用如下命令:
$ mvn test -Dtest=RandomGeneratorTest这里test参数的值是测试用例的类名,这行命令的效果就是只有RandomGeneratorTest这一个测试类得到运行。
maven-surefire-plugin的test参数还支持高级一些的赋值方式,能让用户更灵活地指定需要运行的测试用例。如:
$ mvn test -Dtest=Random*Test星号可以匹配另个或多个字符,上述命令会运行项目中所有类名以Random开头、Test结尾的测试类。
除了星号匹配,还可以使用逗号指定多个测试用例:
$ mvn test -Dtest=RandomGeneratorTest,AccountCaptchaServiceTest该命令的test参数值是两个测试类名,它们之间用逗号隔开,其效果就是告诉Maven只运行这两个测试类。
当然也可以结合上述两种方式。
$ mvn test -Dtest=Random*Test,AccountCaptchaServiceTest当上述命令无法匹配到任何类的时候,就会抛错,根据错误提示可以加上-DfailIfNoTests=false,告诉maven-surefire-plugin即使没有任何测试也不要报错:
$ mvn test -Dtest -DfailIfNoTests=false这样就可以顺利构件完毕了。
Maven提倡约定优于配置原则,因此用户应该尽量遵守这一组模式来为测试类命名。 即便如此,maven-surefire-plugin还是允许用户通过额外的配置来自定义包含一些其他测试类,或者排除一些符合默认命名模式的测试类。
例如,由于历史原因,有些项目所有测试类名称都以Tests结尾,这样的名字不符合默认的3种模式,因此不会被自动执行,用户可以通过下列代码的配置让Maven自动运行这些测试。
<plugin>
	<groupId>org.apache.maven.plugins</groupId>
	<artifactId>maven-surefire-plugin</artifactId>
	<version>2.5</version>
	<configuration>
		<includes>
			<include>**/*Tests.java</include>
		</includes>
	</configuration>
</plugin>上述代码清单中使用了**/*Tests.java类匹配所有以Tests结尾的Java类,两个星号**用来匹配任意路径,一个星号*匹配除路径风格符外的0个或者多个字符。
类似地,也可以使用<excludes>元素排除一些符合默认命名模式的测试类,如下:
<plugin>
	<groupId>org.apache.maven.plugins</groupId>
	<artifactId>maven-surefire-plugin</artifactId>
	<version>2.5</version>
	<configuration>
		<excludes>
			<exclude>**/*ServiceTest.java</exclude>
			<exclude>**/TempDaoTest.java</exclude>
		</excludes>
	</configuration>
</plugin>有了<excludes>配置后,maven-surefire-plugin将不再自动运行它们。
除了命令行输出,Maven用户可以使用maven-surefire-plugin等插件以文件的形式生成更丰富的测试报告。
默认情况下,maven-surefire-plugin会在项目中的target/surefire-reports目录下生成两种格式的错误报告:
- 简单文本格式
- 与JUnit兼容的 XML 格式
如下为简单文本格式的输出内容:
-------------------------------------------------------------------------------
Test set: com.juvenxu.mvnbook.account.captcha.AccountCaptchaServiceTest
-------------------------------------------------------------------------------
Tests run: 3, Failures: 0, Errors: 0, Skipped: 0, Time elapsed: 4.96 sec
如下为XML格式的输出内容:
<?xml version="1.0" encoding="UTF-8" ?>
<testsuite tests="3" failures="0" name="com.juvenxu.mvnbook.account.captcha.AccountCaptchaServiceTest" time="4.838" errors="0" skipped="0">
  <properties>
    <property name="java.runtime.name" value="Java(TM) SE Runtime Environment"/>
    .........
    <property name="java.vm.specification.version" value="1.8"/>
    <property name="sun.arch.data.model" value="64"/>
    <property name="sun.java.command" value="org.codehaus.plexus.classworlds.launcher.Launcher test"/>
    <property name="java.specification.vendor" value="Oracle Corporation"/>
    <property name="user.language" value="zh"/>
    <property name="awt.toolkit" value="sun.lwawt.macosx.LWCToolkit"/>
    <property name="java.vm.info" value="mixed mode"/>
    <property name="java.version" value="1.8.0_291"/>
    <property name="java.vendor" value="Oracle Corporation"/>
    <property name="maven.home" value="/Users/******/software/maven"/>
    <property name="file.separator" value="/"/>
    <property name="java.vendor.url.bug" value="http://bugreport.sun.com/bugreport/"/>
    <property name="sun.cpu.endian" value="little"/>
    <property name="sun.io.unicode.encoding" value="UnicodeBig"/>
    <property name="sun.cpu.isalist" value=""/>
  </properties>
  <testcase classname="com.juvenxu.mvnbook.account.captcha.AccountCaptchaServiceTest" name="testGenerateCaptcha" time="4.559"/>
  <testcase classname="com.juvenxu.mvnbook.account.captcha.AccountCaptchaServiceTest" name="testValidateCaptchaCorrect" time="0.113"/>
  <testcase classname="com.juvenxu.mvnbook.account.captcha.AccountCaptchaServiceTest" name="testValidateCaptchaIncorrect" time="0.166"/>
</testsuite>
XML格式的报告主要是为了支持工具的解析,如 Exclipse 的 jUnit 插件,由于这种 XML 格式已经成为了Java单元测试报告的事实标准,一些其他工具也能使用它们。
测试覆盖率是衡量项目代码质量的一个重要参考指标。Cobertura是一个优秀的开源测试覆盖率统计工具cobertura.github.io/cobertura/,Maven通过cobertura-maven-plugin与之集成,用户可以使用简单的命令为Maven项目生成测试覆盖率报告。
例如,可以在account-captcha目录下运行如下命令生成报告:
$ mvn cobertura:bobertura接着打开项目目录target/site/cobertura/下的index.html文件,就能看到测试覆盖率报告。
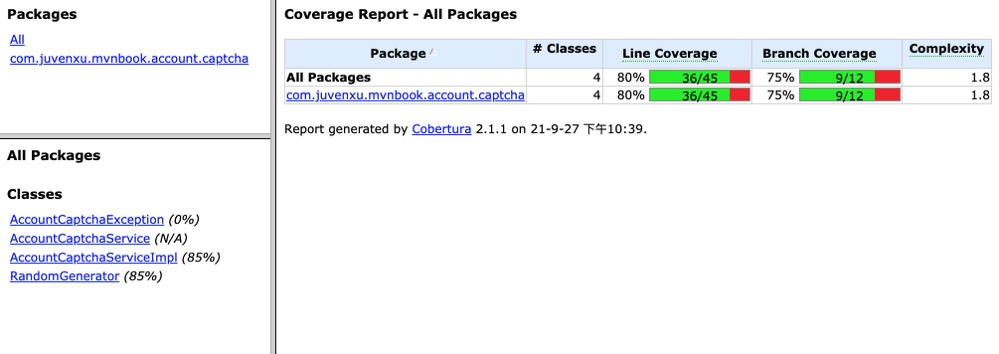
单机具体的类,还能看到精确到行号的覆盖率报告,如下图:

TestNG是 Java社区中除JUnit之外另一个流行的单元测试框架。 NG是Next Generation的缩写,译为“下一代”。
TestNG在JUnit的基础上增加了很多特性,读者可以访问其站点https://testng.org获取更多信息。
使用Maven运行TestNG十分方便。以account-captcha测试代码为例,首先需要删除POM中的JUnit依赖,加入TestNG依赖:
<dependency>
	<groupId>org.testng</groupId>
	<artifactId>testng</artifactId>
	<version>6.6</version>
	<scope>test</scope>
	<!--<classfier>jdk15</classfier>-->
</dependency>与JUnit类似,TestNG的依赖范围应为test。
下一步需要将JUnit的类库引用更改成对TestNG的类库引用。
JUnit 与 TestNG 的常用类对应关系
| JUnit 类 | TestNG 类 | 作用 |
|---|---|---|
org.junit.Test |
org.testng.annotations.Test |
标注方法为测试方法 |
org.junit.Assert |
org.testng.Assert |
检查测试结果 |
org.junit.Before |
org.testng.annotations.BeforeMethod |
标注方法在每个测试方法之前运行 |
org.junit.After |
org.testng.annotaions.AfterMethod |
标注方法在每个测试方法之后运行 |
org.junit.BeforeClass |
org.testng.annotations.BeforeClass |
标注方法在所有测试方法之前运行 |
org.junit.AfterClass |
org.testng.annotations.AfterClass |
标注方法在所有测试方法之后运行 |
将JUnit的类库引用改成TestNG之后,在命令行输入 mvn test,Maven 就会自动运行那些符合命名模式的测试类。这一点与运行JUnit测试没有区别。
TestNG允许用户使用一个名为testng.xml的文件来配置想要运行的测试集合。例如,可以在account-captcha的项目目录下创建一个testng.xml文件,配置只运行RandomGeneratorTest,如下所示:
<?xml version="1.0" encoding="UTF-8"?>
<suite name="Suite1" verbose="1">
	<test name="Regression1">
		<classes>
			<class name="com.juvenxu.mvnbook.account.captcha.RandomGeneratorTest"/>
		</classes>
	</test>
</suite>同时修改account-parent的POM文件,在配置maven-surefire-plugin使用该testng.xml,如下所示:
<plugin>
	<groupId>org.apache.maven.plugins</groupId>
	<artifactId>maven-surefire-plugin</artifactId>
	<version>2.5</version>
	<configuration>
		<suiteXmlFiles>
			<suiteXmlFile>testng.xml</suiteXmlFile>
		</suiteXmlFiles>
	</configuration>
</plugin>TestNG较JUnit的一大优势在于它支持测试组的概念,如下的注解会将测试方法加入到两个测试组util和medium中:
@Test(groups={"util","medium"})由于用户可以自由地标注方法所属的测试组,因此这种机制能让用户在方法级别对测试进行归类。 这一点JUnit无法做到,它只能实现类级别的测试归类。
Maven用户可以使用如下代码所示的配置运行一个或者多个TestNG测试组:
<plugin>
	<groupId>org.apache.maven.plugins</groupId>
	<artifactId>maven-surefire-plugin</artifactId>
	<version>2.5</version>
	<configuration>
		<groups>util,medium</groups>
	</configuration>
</plugin>
由于篇幅所限,这里不再介绍更多 TestNG 的测试技术,感兴趣的读者可以访问 TestNG社区站点。
优秀的程序员回想对待产品代码一样细心维护测试代码,尤其是那些供具体测试类继承的抽象类,它们能够简化测试代码的编写。还有一些根据具体项目环境对测试框架的扩展,也会被大范围地重用。
在命令行运行mvn package的时候,Maven会将项目的主代码及资源文件打包,将其安装或部署到仓库之后,这些代码就能为他人使用,从而实现Maven项目级别的重用。 默认的打包行为是不会包含测试代码的,因此在使用外部依赖的时候,其构件一般都不会包含测试代码。
然后,在项目内部重用某个模块的测试代码是很常见的需求,可能某个底层模块的测试代码中包含了一些常用的测试工具类,或者一些高质量的测试基类供继承。 这个时候Maven用户就需要通过maven-jar-plugin将测试类打包,如下所示:
<plugin>
	<groupId>org.apache.maven.plugins</groupId>
	<artifactId>maven-jar-plugin</artifactId>
	<version>2.2</version>
	<executions>
		<execution>
			<goals>
				<goal>test-jar</goal>
			</goals>
		</execution>
	</executions>
</plugin>maven-jar-plugin有两个目标,分别是jar和test-jar,前者是通过Maven的内置绑定在default生命周期的package阶段运行,其行为就是对项目主代码进行打包,而后者并没有内置绑定,因此上述的插件配置显式声明该目标来打包测试代码。 通过查询该插件的具体信息可以了解到,test-jar的默认绑定周期阶段为package,因此当运行mvn clean package 便可以打包主代码和测试代码。
现在,就可以通过依赖声明使用这样的测试包构件了,如下所示:
<dependency>
	<groupId>org.juvenxu.mvnbook.account</groupId>
	<artifactId>account-captcha</artifactId>
	<version>1.0.0-SNAPSHOT</version>
	<type>test-jar</type>
	<scope>test</scope>
</dependency>上述依赖声明中有一个特殊的元素type,所有测试包构件都使用特殊的test-jar打包类型。 需要注意的是,这一类型的依赖同样都使用test依赖范围。
本篇的主题是Maven与测试的继承,不过在讲述具体的测试技巧之前先实现了背景案例的account-captcha模块,这一模块的测试代码也成了本章其他内容良好的素材。
maven-surefire-plugin是Maven背后真正执行测试的插件,它有一组默认的文件名模式来匹配并自动运行测试类。 用户还可以使用该插件来跳过测试、动态执行测试类、包含或排除测试等。
maven-surefire-plugin能生成基本的测试报告,除此之外还能使用cobertura-maven-plugin生成测试覆盖率报告。
除了主流的 JUnit 之外,本文还讲述了如何与 TestNG 继承,最后介绍了如何重用测试代码。