This project covers an IoT devices network using HTTP transmission between two Raspberry Pi 3 B model, which one of the Rasps collects the sensor temperature and the other one acts like a webserver with Flask, providing the received temperature data to a mobile device - developed with VueJS 2 and PWA boilerplate. This way, the user can check if there's a fire with his/her mobile device.
As security will be in check, network transmissions will always have a Darth reading and modifying the collected data. The proposed work aims to establish this IoT network and sniffer data transmitted.
This work was developed as a final work for College Security and Auditing Systems Course in Federal Paraná Technological University - Campus Cornélio Procópio (UTFPR-CP).
⚠️ This work was developed for educational means, and shouldn't be used as illegal activities. The authors can't take responsability if it's used for such cases.
-
Two Raspberry Pi Model 3 with Ubuntu 16.0.3 for ARM versions (not tested with other Linux Distros)
-
DHT11 or similar (Temperature/Humidity Sensor)
-
Protoboard or similar
-
Local network access (eth0 or wlan0)
-
Linux Distro Debian-based (used was Kali with all necessary tools for sniffering)
-
Python 2.7.12+
⚠️ Python 3+ wasn't tested!
-
Pip 9.0.1+ (Python Package Manager)
-
NPM 4.1.2+ (if you want to build VueJS PWA)
-
Screen Monitor (to connect Raspberry Visual Interface)
-
Virtualenv (installed in Raspberry Ubuntu OS)
-
Git 2.7.4+ (installed in Raspberry Ubuntu OS)
The work is represented by the diagram below in a configured local network (IP 192.168.1.1).
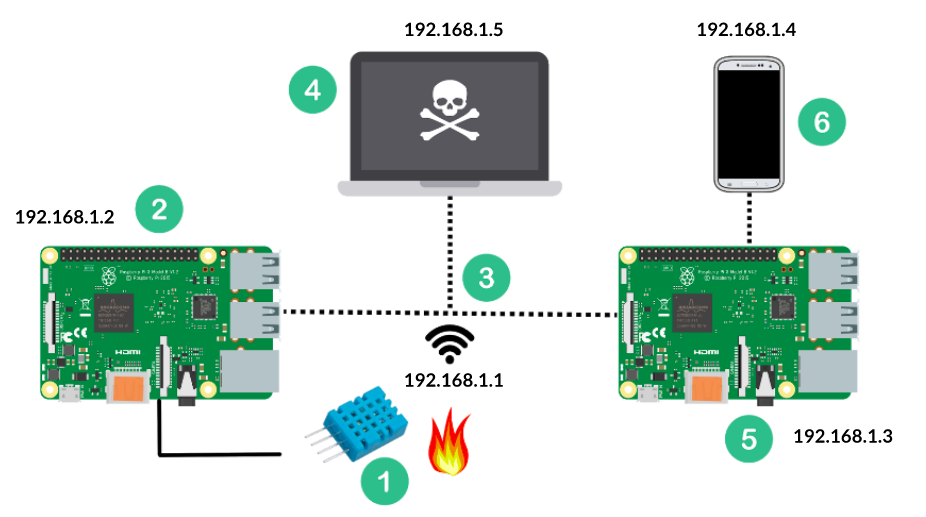
The main connection happens between two Raspberrys, which are configured as Client (Local IP 192.168.1.2) and Web Server (Local IP 192.168.1.3). Besides those, there is a temperature/humidity sensor (DHT11 Module) connected to Raspberry Client and a hibrid mobile application connected to Raspberry Web Server with WebSocket Protocol.
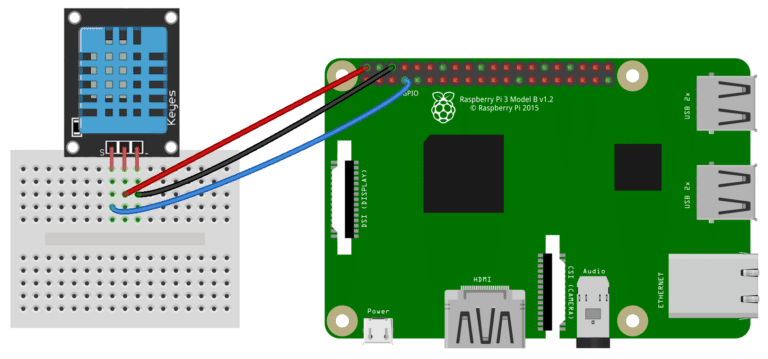
The DHT11 module used was like the one in the left from the image below, with only three output pins - but the other option can be used as well.

Since the project collects temperature in real-time, the sensor needs to be connected to the Raspberry Client. To make it easy, just follow the diagram below to connect properly all three output-pins:
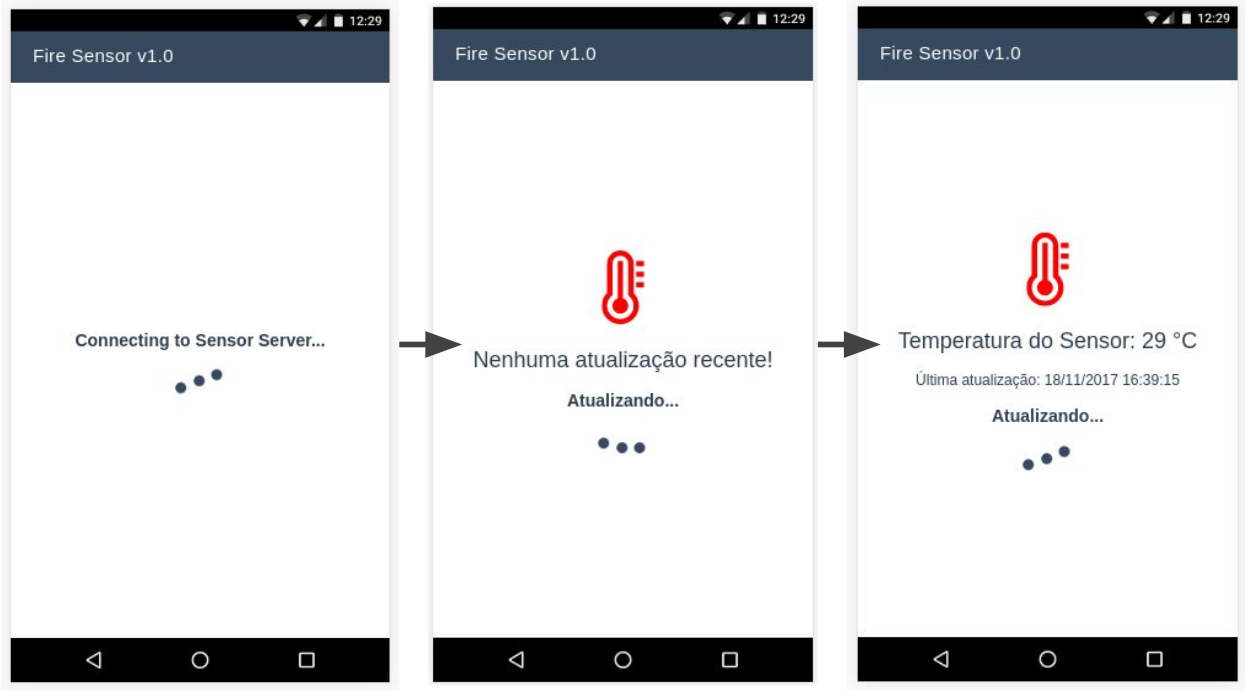
The hibrid mobile application was developed using VueJS with a Progressive Web Application (PWA) boilerplate, with a interface clean and real-time synchronized:
Turn on your Rasp, connect to your screen monitor, login and run the following to start Ubuntu graphical interface:
$ startxYou can run this tutorial without a graphical interface, but Wi-Fi will have to be connected through bash (not covered here).
Clone this repository with the following command on bash:
$ git clone https://github.com/davikawasaki/iot-security-vulnerability.gitIf this Rasp doesn't have virtualenv installed (check whereis virtualenv), install with pip:
# install virtualenv (MacOS X or Linux)
$ sudo pip install virtualenv

# install virtualenv (Ubuntu)
$ sudo apt-get install python-virtualenvThis section won't cover PWA Concepts, VueJS, NodeJS and Webpack Development, but it'll show steps to run locally and build to Raspberry Web Server static folder.
The Progressive Web Application was developed using VueJS 2 Javascript Framework. Since it's a PWA, the web application can be accessed and installed as an application in smartphones. The PWA raw files can be found at /iot-security-vulnerability/pwa/.
To run exclusively the PWA in localhost:8080, run the following commands (you'll need to have NPM installed):
$ cd iot-security-vulnerability/pwa/
$ npm install
$ npm run dev
If all process run correctly, the following will be shown in bash:
 DONE  Compiled successfully in 12872ms                                                9:01:56 PM

> Listening at http://localhost:8080
However, this work doesn't depend from a NodeJS to provide the PWA. Since it's a web application as well, this PWA Single Page Application is builded and minified with Webpack in /iot-security-vulnerability/pwa/dist/ folder as the commands below:
$ cd iot-security-vulnerability/pwa/
$ npm install # if not runned before
$ npm run build
The build output will be something similar to this:
> [email protected] build /iot-security-vulnerability/pwa
> node build/build.js

⠼ building for production...Total precache size is about 267 kB for 5 resources.
Hash: afbed9ecb1a887050e12
Version: webpack 3.8.1
Time: 14309ms
                                       Asset       Size  Chunks                    Chunk Names
      img/icons/apple-touch-icon-120x120.png    3.37 kB          [emitted]
           js/vendor.678d206475ce8da6e2da.js     253 kB       0  [emitted]  [big]  vendor
         js/manifest.fe9dbcbdbca976fd7650.js    1.48 kB       2  [emitted]         manifest
css/app.99c58ade03bc998c03bb53089c97be80.css    2.42 kB       1  [emitted]         app
       js/vendor.678d206475ce8da6e2da.js.map    1.59 MB       0  [emitted]         vendor
          js/app.720a4315354c57e4a166.js.map    64.6 kB       1  [emitted]         app
     js/manifest.fe9dbcbdbca976fd7650.js.map    14.2 kB       2  [emitted]         manifest
                                  index.html    2.46 kB          [emitted]
        img/icons/android-chrome-512x512.png    29.8 kB          [emitted]
        img/icons/android-chrome-192x192.png    9.42 kB          [emitted]
      img/icons/apple-touch-icon-152x152.png    4.05 kB          [emitted]
              js/app.720a4315354c57e4a166.js    7.52 kB       1  [emitted]         app
      img/icons/apple-touch-icon-180x180.png    4.68 kB          [emitted]
        img/icons/apple-touch-icon-60x60.png    1.49 kB          [emitted]
        img/icons/apple-touch-icon-76x76.png    1.82 kB          [emitted]
              img/icons/apple-touch-icon.png    4.68 kB          [emitted]
                 img/icons/favicon-32x32.png    1.27 kB          [emitted]
                       img/icons/favicon.ico    15.1 kB          [emitted]
    img/icons/msapplication-icon-144x144.png    1.17 kB          [emitted]
                img/icons/mstile-150x150.png    4.28 kB          [emitted]
             img/icons/safari-pinned-tab.svg    10.6 kB          [emitted]
                               manifest.json  445 bytes          [emitted]
                 img/icons/favicon-16x16.png  799 bytes          [emitted]

  Build complete.

  Tip: built files are meant to be served over an HTTP server.
  Opening index.html over file:// won't work.
The last step will be make PWA available as a static website in Raspberry Web Server, which just needs a copy of dist/ builded folder to /iot-security-vulnerability/raspberry_server/static/ folder:
# Remove older static files from Raspberry Server static folder
$ rm ../raspberry_server/raspserver/static/index.html
$ rm ../raspberry_server/raspserver/static/manifest.json
$ rm ../raspberry_server/raspserver/static/service-worker.js
# Copy new builded files to Raspberry Server static folder
$ cd dist/
$ cp index.html ../../raspberry_server/raspserver/static/
$ cp manifest.json ../../raspberry_server/raspserver/static/
$ cp service-worker.js ../../raspberry_server/raspserver/static/
$ cp -R css/ ../../raspberry_server/raspserver/static/
$ cp -R img/ ../../raspberry_server/raspserver/static/
$ cp -R js/ ../../raspberry_server/raspserver/static/After Rasps default config and builded PWA, one of Raspberrys is used as a web server running on Flask, with resources to consume a PWA application and a webhook (under /load URI resource). This resource will be used by Rasp Client to receive real-time temperatures. Besides, the server has a web socket configuration with Socket-IO, which is a socket protocol (specified in HTML5) that configures real-time communication between a client and a server.
Go to raspberry_server folder inside cloned git repository with cd command in bash:
$ cd iot-security-vulnerability/raspberry_server/Enable python virtual environment (venv) to run python folder-specific packages:
$ virtualenv venvBash will show something similar to these lines:
Running virtualenv with interpreter /usr/bin/python2
New python executable in /iot-security-vulnerability/raspberry_server/venv/bin/python2
Also creating executable in /iot-security-vulnerability/raspberry_server/venv/bin/python
Installing setuptools, pkg_resources, pip, wheel...done.
Disable any python virtual environment (venv) that's activated:
$ deactivateActivate project folder venv (will enable a venv text before user terminal):
# MacOS X or Linux
$ . venv/bin/activate

# Windows
$ venv\Scripts\activate
After python virtual environment activated for this folder, the server dependencies need to be installed with pip:
$ pip install -e .Bash will show dependencies being obtained and installed:
Obtaining file:///<HOME_FOLDER>/iot-security-vulnerability/raspberry_server
Collecting pytz (from raspserver==0.0.0)

[...]

Installing collected packages: pytz, itsdangerous, click, Werkzeug, MarkupSafe, Jinja2, flask, greenlet, enum-compat, eventlet, python-engineio, python-socketio, flask-socketio, gunicorn, raspserver
This web server application follows a module-pattern in Python, which enables the pip install setup above. Since it's a module, it needs to inform Flask it's name through environment variables:
# exporting as normal user
$ export FLASK_APP=raspserver

# exporting as root (to run flask in port 80)
$ sudo su; export FLASK_APP='raspserver'
If you want a full debug of the application with a hot reload functionality, export the following environment variable:
# exporting as normal user
$ export FLASK_DEBUG=true

# exporting as root (to run flask in port 80)
$ sudo su; export FLASK_DEBUG='true'
Flask Web Server needs the localhost IP or Rasp network IP. Since you'll need its network IP in sniffer section, run the following command to get Rasp local network IP:
$ ifconfigThis command will basically get your IP address in your local network. The output will look something similar as below:
wlp2s0    Link encap:Ethernet  HWaddr aa:aa:aa:aa:aa:aa
          inet addr:192.168.1.3  Bcast:192.168.1.255  Mask:255.255.255.0
          inet6 addr: aaaa::aaaa:aaaa:aaaa:aaaa/64 Scope:Link
          UP BROADCAST RUNNING MULTICAST  MTU:1500  Metric:1
          RX packets:1402074 errors:0 dropped:0 overruns:0 frame:0
          TX packets:138480 errors:0 dropped:0 overruns:0 carrier:0
          collisions:0 txqueuelen:1000
          RX bytes:246640237 (246.6 MB)  TX bytes:38767153 (38.7 MB)
With everything configured and your Raspberry Web Server IP stored, the server can run with two options:
# run flask on port 8080, exposing to local network
$ flask run --host=<RASP-SERVER-LOCAL-IP> --port=8080

# run flask on port 80 (with sudo)
$ sudo su; flask run --host=<RASP-SERVER-LOCAL-IP> --port=80
This will show something like this in bash (FLASK_DEBUG true and running on port 8080):
 * Serving Flask-SocketIO app "raspserver"
 * Forcing debug mode on
 * Restarting with stat
 * Debugger is active!
 * Debugger PIN: 242-335-328
(30322) wsgi starting up on http://192.168.1.3:8080Another Raspberry can be used as a client, which is responsible of transmiting temperature requests to Rasp Flask Server. This client uses Adafruit DHT and Python Requests modules to collect and transmit real-time temperatures.
Go to raspberry_client folder inside cloned git repository with cd command in bash:
$ cd iot-security-vulnerability/raspberry_client/Enable python virtual environment (venv) to run python folder-specific packages:
$ virtualenv venvBash will show something similar to these lines:
Running virtualenv with interpreter /usr/bin/python2
New python executable in /raspberry_server/venv/bin/python2
Also creating executable in /iot-security-vulnerability/raspberry_client/venv/bin/python
Installing setuptools, pkg_resources, pip, wheel...done.
Disable any python virtual environment (venv) that's activated:
$ deactivateActivate project folder venv (will enable a venv text before user terminal):
# MacOS X or Linux
$ . venv/bin/activate

# Windows
$ venv\Scripts\activate
With virtual environment activated for Raspberry Client, dependencies can be installed. Start with Requests Library installation:
$ pip install requestsBash will show dependencies being obtained and installed for Requests similar to below (this case libraries were already in cache):
Collecting requests
  Using cached requests-2.18.4-py2.py3-none-any.whl
Collecting urllib3<1.23,>=1.21.1 (from requests)
  Using cached urllib3-1.22-py2.py3-none-any.whl
Collecting idna<2.7,>=2.5 (from requests)
  Using cached idna-2.6-py2.py3-none-any.whl
Collecting chardet<3.1.0,>=3.0.2 (from requests)
  Using cached chardet-3.0.4-py2.py3-none-any.whl
Collecting certifi>=2017.4.17 (from requests)
  Using cached certifi-2017.11.5-py2.py3-none-any.whl
Installing collected packages: urllib3, idna, chardet, certifi, requests
Successfully installed certifi-2017.11.5 chardet-3.0.4 idna-2.6 requests-2.18.4 urllib3-1.22
The other library to be installed is to collect data from Adafruit DHT11 Sensor. In this case, follow the commands below, which will clone the library with Git and run its respective setup:
# clone Adafruit DHT11 library
$ git clone https://github.com/adafruit/Adafruit_Python_DHT.git

# check if system is ready (On Raspbian or Beaglebone Black's Debian/Ubuntu)
$ sudo apt-get install build-essential python-dev

# install Adafruit DHT11 library on Raspberry environment
$ cd Adafruit_Python_DHT; sudo python setup.py install
Something like this will be shown in bash:
running install
running bdist_egg
running egg_info
creating Adafruit_DHT.egg-info
writing Adafruit_DHT.egg-info/PKG-INFO
writing top-level names to Adafruit_DHT.egg-info/top_level.txt
writing dependency_links to Adafruit_DHT.egg-info/dependency_links.txt
writing manifest file 'Adafruit_DHT.egg-info/SOURCES.txt'
reading manifest file 'Adafruit_DHT.egg-info/SOURCES.txt'
writing manifest file 'Adafruit_DHT.egg-info/SOURCES.txt'
installing library code to build/bdist.linux-x86_64/egg
running install_lib
running build_py
creating build

[...]

removing 'build/bdist.linux-x86_64/egg' (and everything under it)
Processing Adafruit_DHT-1.3.2-py2.7-linux-x86_64.egg
Copying Adafruit_DHT-1.3.2-py2.7-linux-x86_64.egg to /usr/local/lib/python2.7/dist-packages
Adding Adafruit-DHT 1.3.2 to easy-install.pth file

Installed <LIB>/python2.7/dist-packages/Adafruit_DHT-1.3.2-py2.7-linux-x86_64.egg
Processing dependencies for Adafruit-DHT==1.3.2
Finished processing dependencies for Adafruit-DHT==1.3.2
Remember the Raspberry Web Server IP local address collected? In here you'll use it to change the URL that this client will run POST requests. So, before running client script, edit uri.py file (with Nano or Vim) and input Raspberry Web Server IP in the following line (don't forget the http:// protocol and webserver used port):
...

_uri = {
    'production': 'https://security-raspberry-webserver.herokuapp.com',
    'development': <INSERT_HERE_RASP_WEB_SERVER_IP>, # e.g 'http://192.168.1.3:5000'
    'local': 'http://localhost:5000'
}

...
In the next sniffer section, you'll also need Raspberry Client local IP. So, run the following command again to store the respective IP:
$ ifconfigThis command will basically get your IP address in your local network. The output will look something similar as below:
wlp2s0    Link encap:Ethernet  HWaddr aa:aa:aa:aa:aa:aa
          inet addr:192.168.1.2  Bcast:192.168.1.255  Mask:255.255.255.0
          inet6 addr: aaaa::aaaa:aaaa:aaaa:aaaa/64 Scope:Link
          UP BROADCAST RUNNING MULTICAST  MTU:1500  Metric:1
          RX packets:1402074 errors:0 dropped:0 overruns:0 frame:0
          TX packets:138480 errors:0 dropped:0 overruns:0 carrier:0
          collisions:0 txqueuelen:1000
          RX bytes:246640237 (246.6 MB)  TX bytes:38767153 (38.7 MB)
After saving the document, check if your Raspberry Web Server is up & running properly. If it's all setted, just run main.py script:
$ python main.pyNow temperature requests will be sent within 1s period range:
Temperature read by DHT11: 28
Temperature read by DHT11: 28
Resource: http://<RASP_SERVER_IP>:<RASP_SERVER_PORT>/load
{
  "scale": "degrees",
  "timestamp": 1511223048,
  "value": 28
}

Temperature read by DHT11: 29
Temperature read by DHT11: 30
Resource: http://192.168.1.3:80/load
{
  "scale": "degrees",
  "timestamp": 1511223049,
  "value": 30
}

Temperature read by DHT11: 29
Temperature read by DHT11: 29
Resource: http://192.168.1.3:80/load
{
  "scale": "degrees",
  "timestamp": 1511223050,
  "value": 29
}
If you access the Raspberry Web Server IP, you'll check the PWA with temperatures being updated. Now all that's left is sniff and get the packages being transported.
Now it's time to act like Darth (Vader)! In this section you'll intercept the communication between Raspberry Client and Server like a man-in-the-middle, sniffering the exchanged packets.
To start, fire up your Kali distro and connect to the local network. Make sure that the two Raspberrys are up & running, sending and receiving temperatures in real-time. Open the bash.
The first thing is the enabling of IP forwarding in local network (otherwise the sniffer would block requests between communication being watched):
$ echo 1 > /proc/sys/net/ipv4/ip_forwardNow a contamination needs to be executed so that Darth can impersonate Raspberry Web Server to collect in-route packets. This is done through ARP Table Poisoning, which changes in local router ARP table the key-value association between MAC Addresses and connected IPs. The command uses arpspoof command, passing as arguments the communication bridge type (ethernet - eth - or wifi - wlan), the target IP to be inspectioned (Raspberry Client) and the router or receiving end (Raspberry Web Server):
$ arpspoof -i wlan0 -t 192.168.1.2 -r 192.168.1.3 # Check project diagram to remember each node IPIn summary, the ARP Spoof will get the incoming packets from 192.168.1.2 node and redirect to Darth IP address (192.168.1.5). Thanks to IP Forwarding enabled, Darth can see and redirect normally the packets to Raspberry Web Server (192.168.1.3), with modification or not.
With IP Forwarding and ARP Spoof enabled, the communication packets in course can be finally sniffed with Wireshark. When opened, a filter can be applied to select only packets coming from Raspberry Client with POST method request. With this, a HTTP packet can be opened, which will have all communication layers, including the JSON request that's being sent in body:

This shows how vulnerable this IoT network is with only HTTP protocol, without any configured Signed SSL Certificates or Firewall.